Fuel Line Replacement
Vanagon fuel line replacement should be your number one priority, especially if you have a newly acquired van or if the age of the lines is unknown. Sure, replacing your engine oil is important, but if you're overdue it won't end with your entire van on fire! There are few other issues that can cause a catastrophic, 100% loss of your van. Don't believe me? Just do a search for "vanagon engine fires" and you'll see the damage this simple fix will cause if left untreated. I don't have any hard evidence, but I would wager +90% of all Vanagon fires are caused due to old fuel lines or a failure in the plastic fitting going through the firewall. If you have never changed your fuel lines or are unsure of their age, CHANGE THEM NOW.
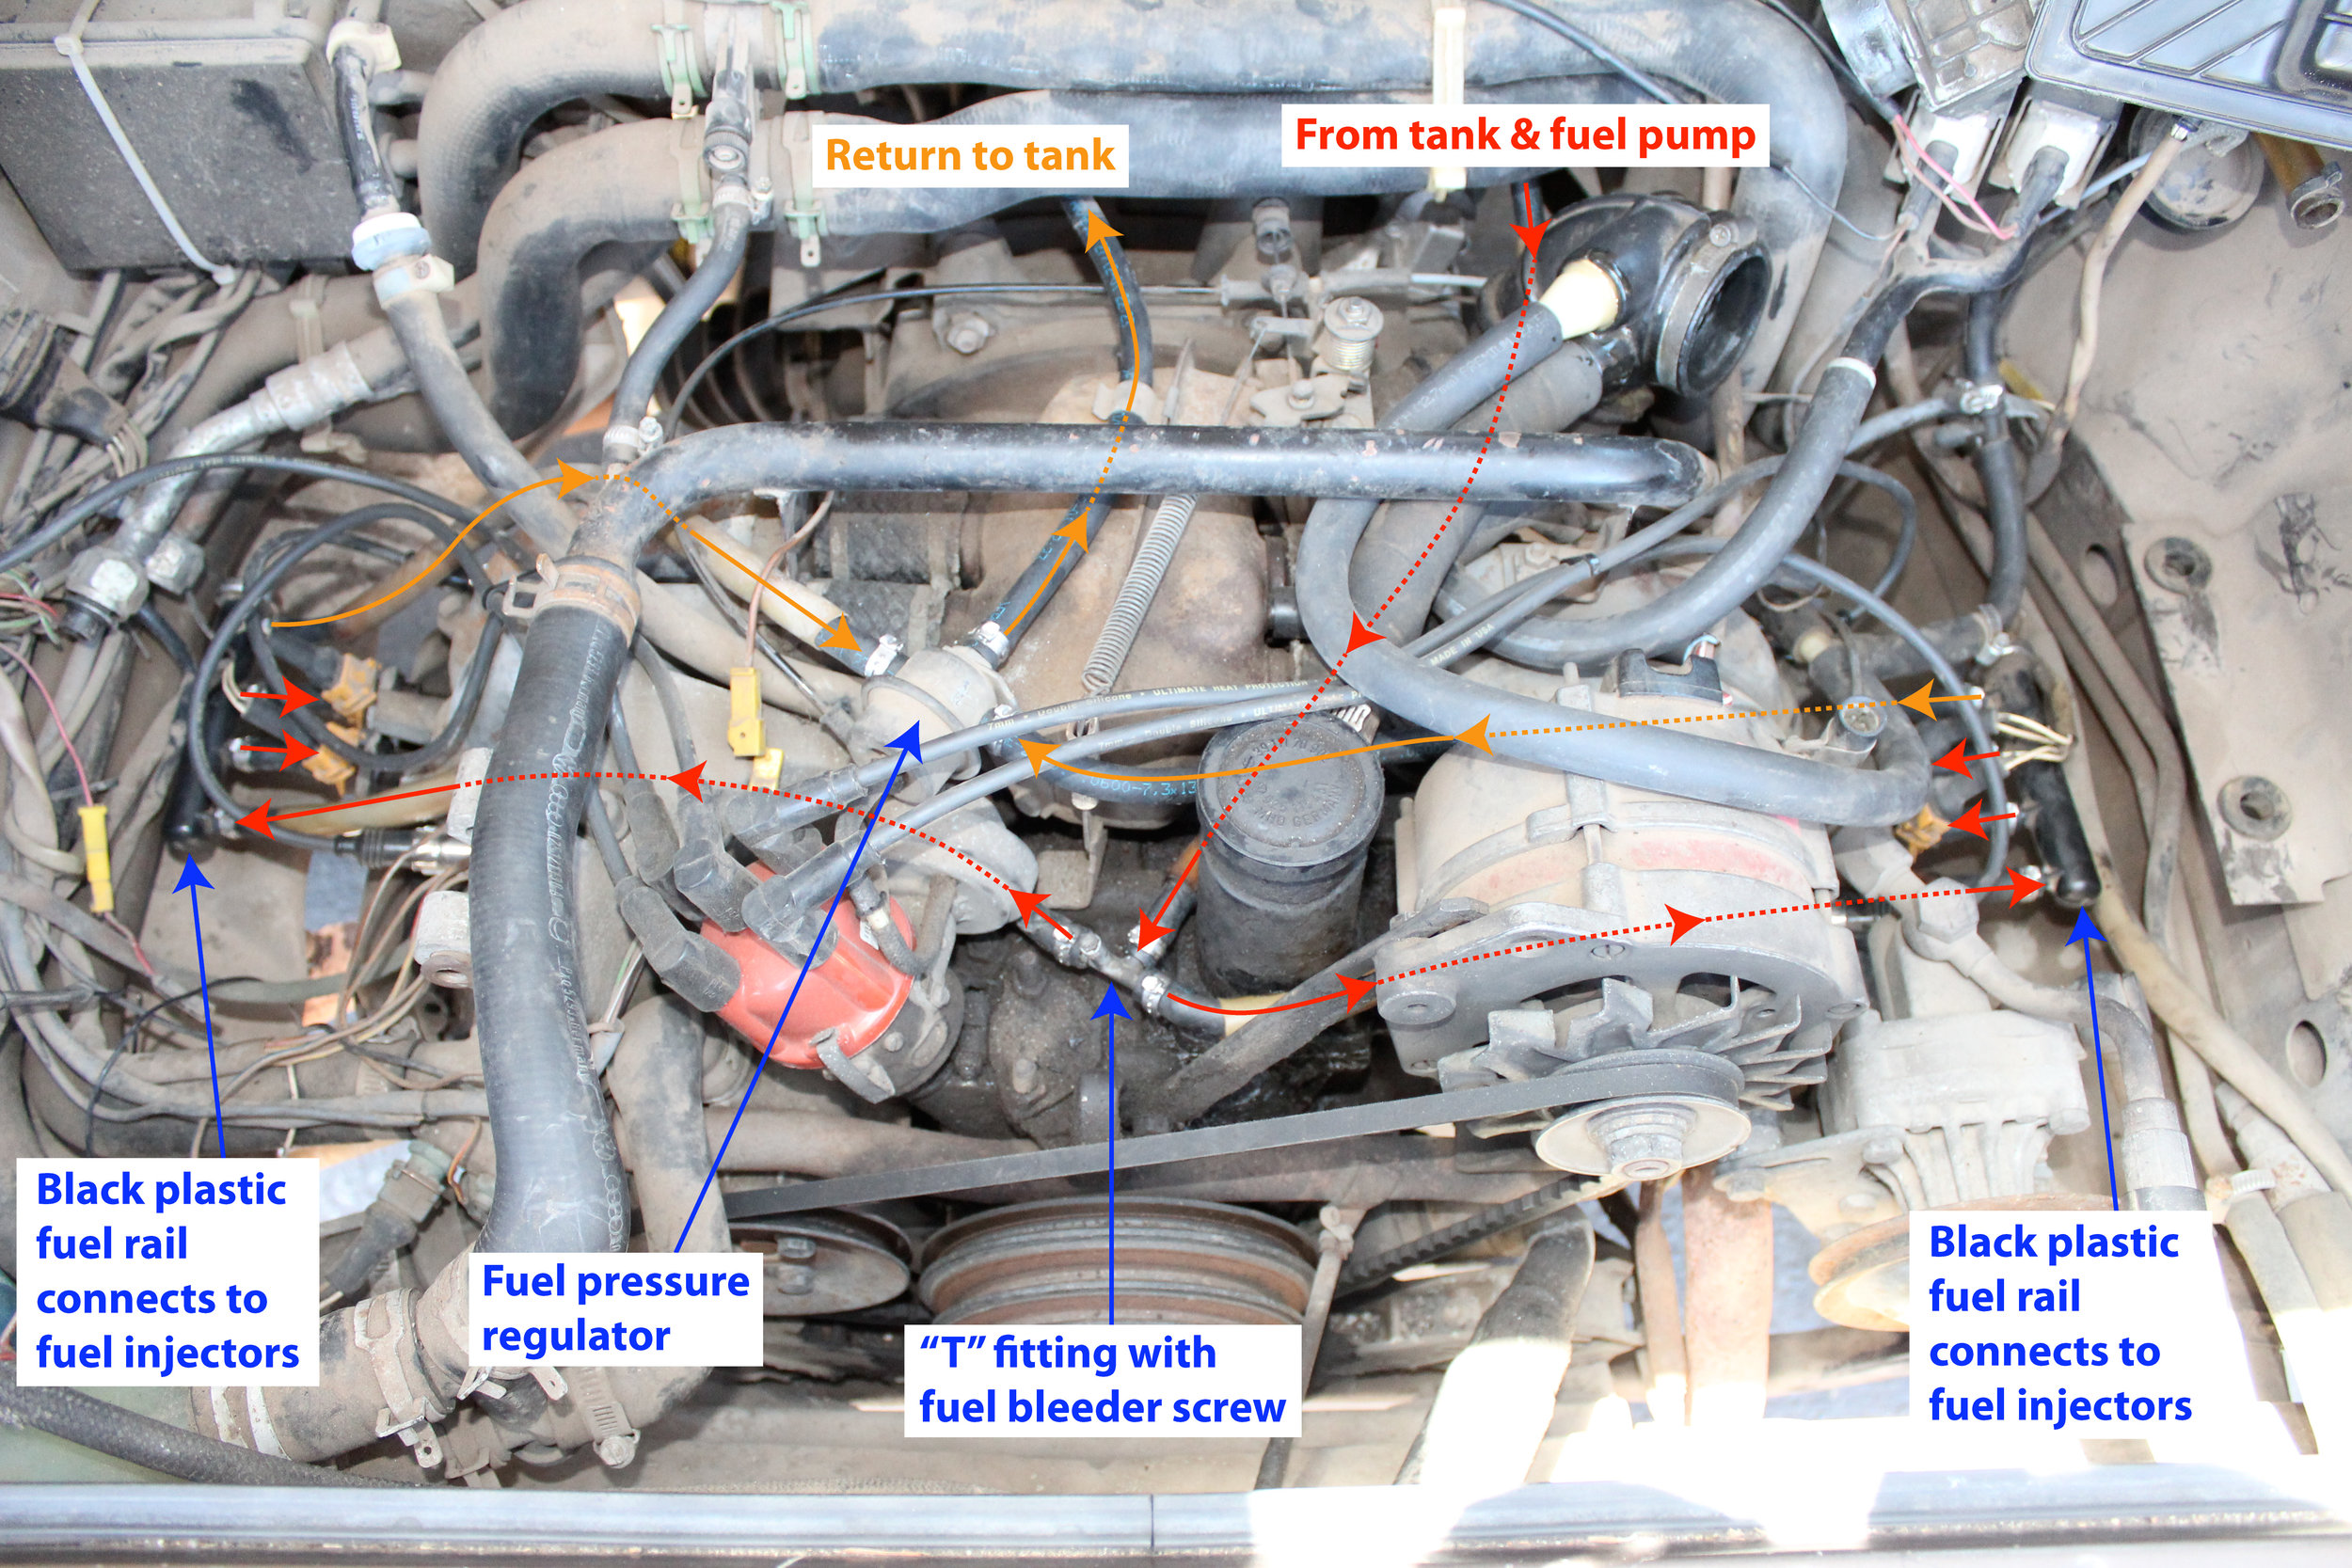
Let's get started and take a look at the flow of the fuel system:
Supplies Needed:


More than a $30 savings over the competition!
If there is one maintenance item that you MUST stay on top of, this is it. Old fuel lines = engine fire = no more van.
Fitment:
Fits 1983 - 1991 water-cooled Vanagons only. Does not work with air-cooled or diesel vans.
See below for full product description.
Tools Needed:
- Philips-head screwdriver
- Flat-head screwdriver
- X-Acto knife - "Classic Fine Point" blade and/or utility knife with a new blade
- Socket Wrench (Highly recommend a full set if you don't have one already.)
- 7 mm socket
- 10 mm socket
- Pincer Pliers (These from Oetiker work great.)
- Paper towels or rags to catch and clean fuel spills
- Rubber gloves
- Jack / jack stands / ramps (if you're small / flexible enough you won't need to raise the van)
- Cardboard as a base under the engine compartment. Some fuel will almost certainly miss your above rags and fall on the ground. The cardboard will hopefully catch any errant drips. Also, the cardboard helps for sliding under the van to reach the firewall connections. This is especially true if your work space is a driveway. Please don't let the gas simply fall on the ground!
- Fire Extinguisher - just in case!
Skill Level: Moderate
Before starting, please read our Disclaimer. By using this website you agree to these terms.
Comments:
Please note that you do NOT have to follow these steps exactly. Many of the steps immediately surrounding each other could be interchanged and accomplish the same result. However, if you jump from Step 1 to Step 10 you'll have some problems. This is simply one work-flow that works well for me. If something different makes sense for you, do it!
Step 1:
Disconnect the battery.
Since you're dealing with fuel and electrical connections, you can never be too safe. The last thing you want is an accidental fire! (See above fire extinguisher recommendation!)
Step 2:
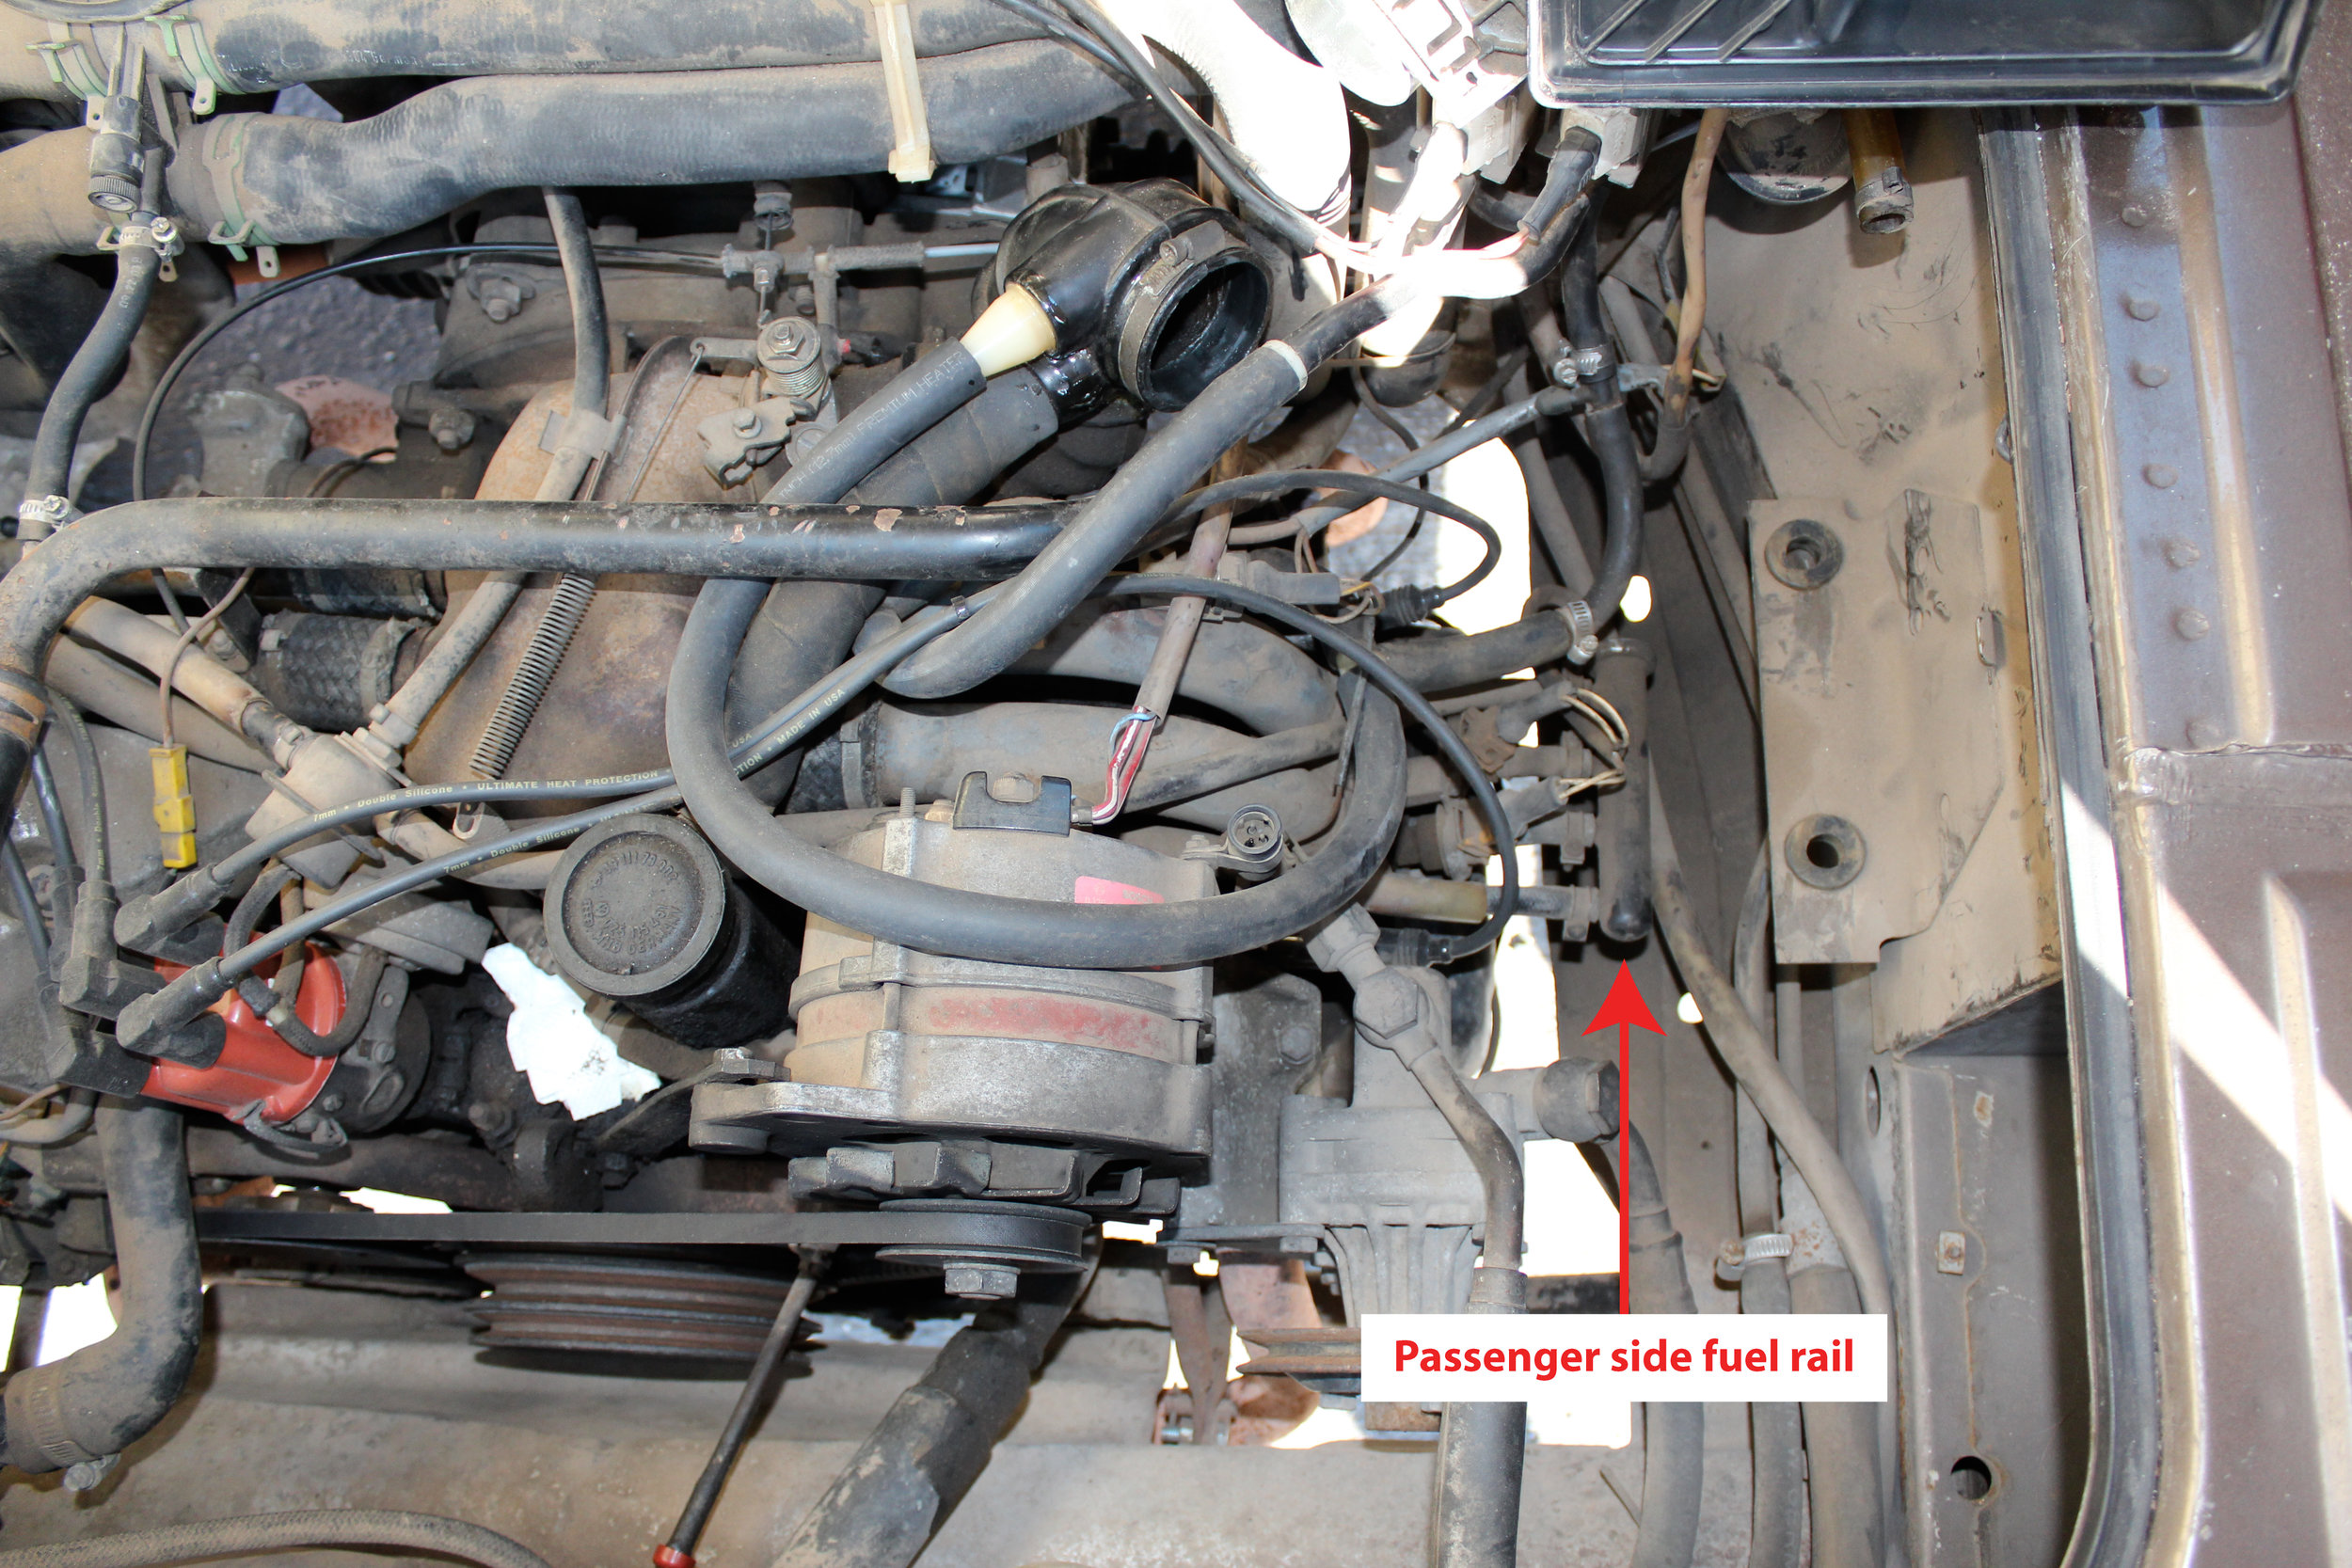
Remove air filter assembly located on the passenger side of the engine. This will give you access to the fuel rail and injectors.
Step 3:
Using a 7 mm socket, open the bleeder screw at the "T" fitting. Place a paper towel or rag underneath to catch the gas. Not much comes out here; maybe an ounce or two.
Step 4:
Using a phillips-head screwdriver loosen the two outside clamps on the driver-side fuel rail. In theory you can pull off the hoses after you loosen them. (If you have crimp-style ear clamps you will need to pry them loose with a small screwdriver, or possibly even cut them.) However, these hoses were so old and dry I eventually had to cut them off. A fair amount of fuel is still in the lines at this point, so be sure to have a large rag or small cup handy to catch it.
Step 5:
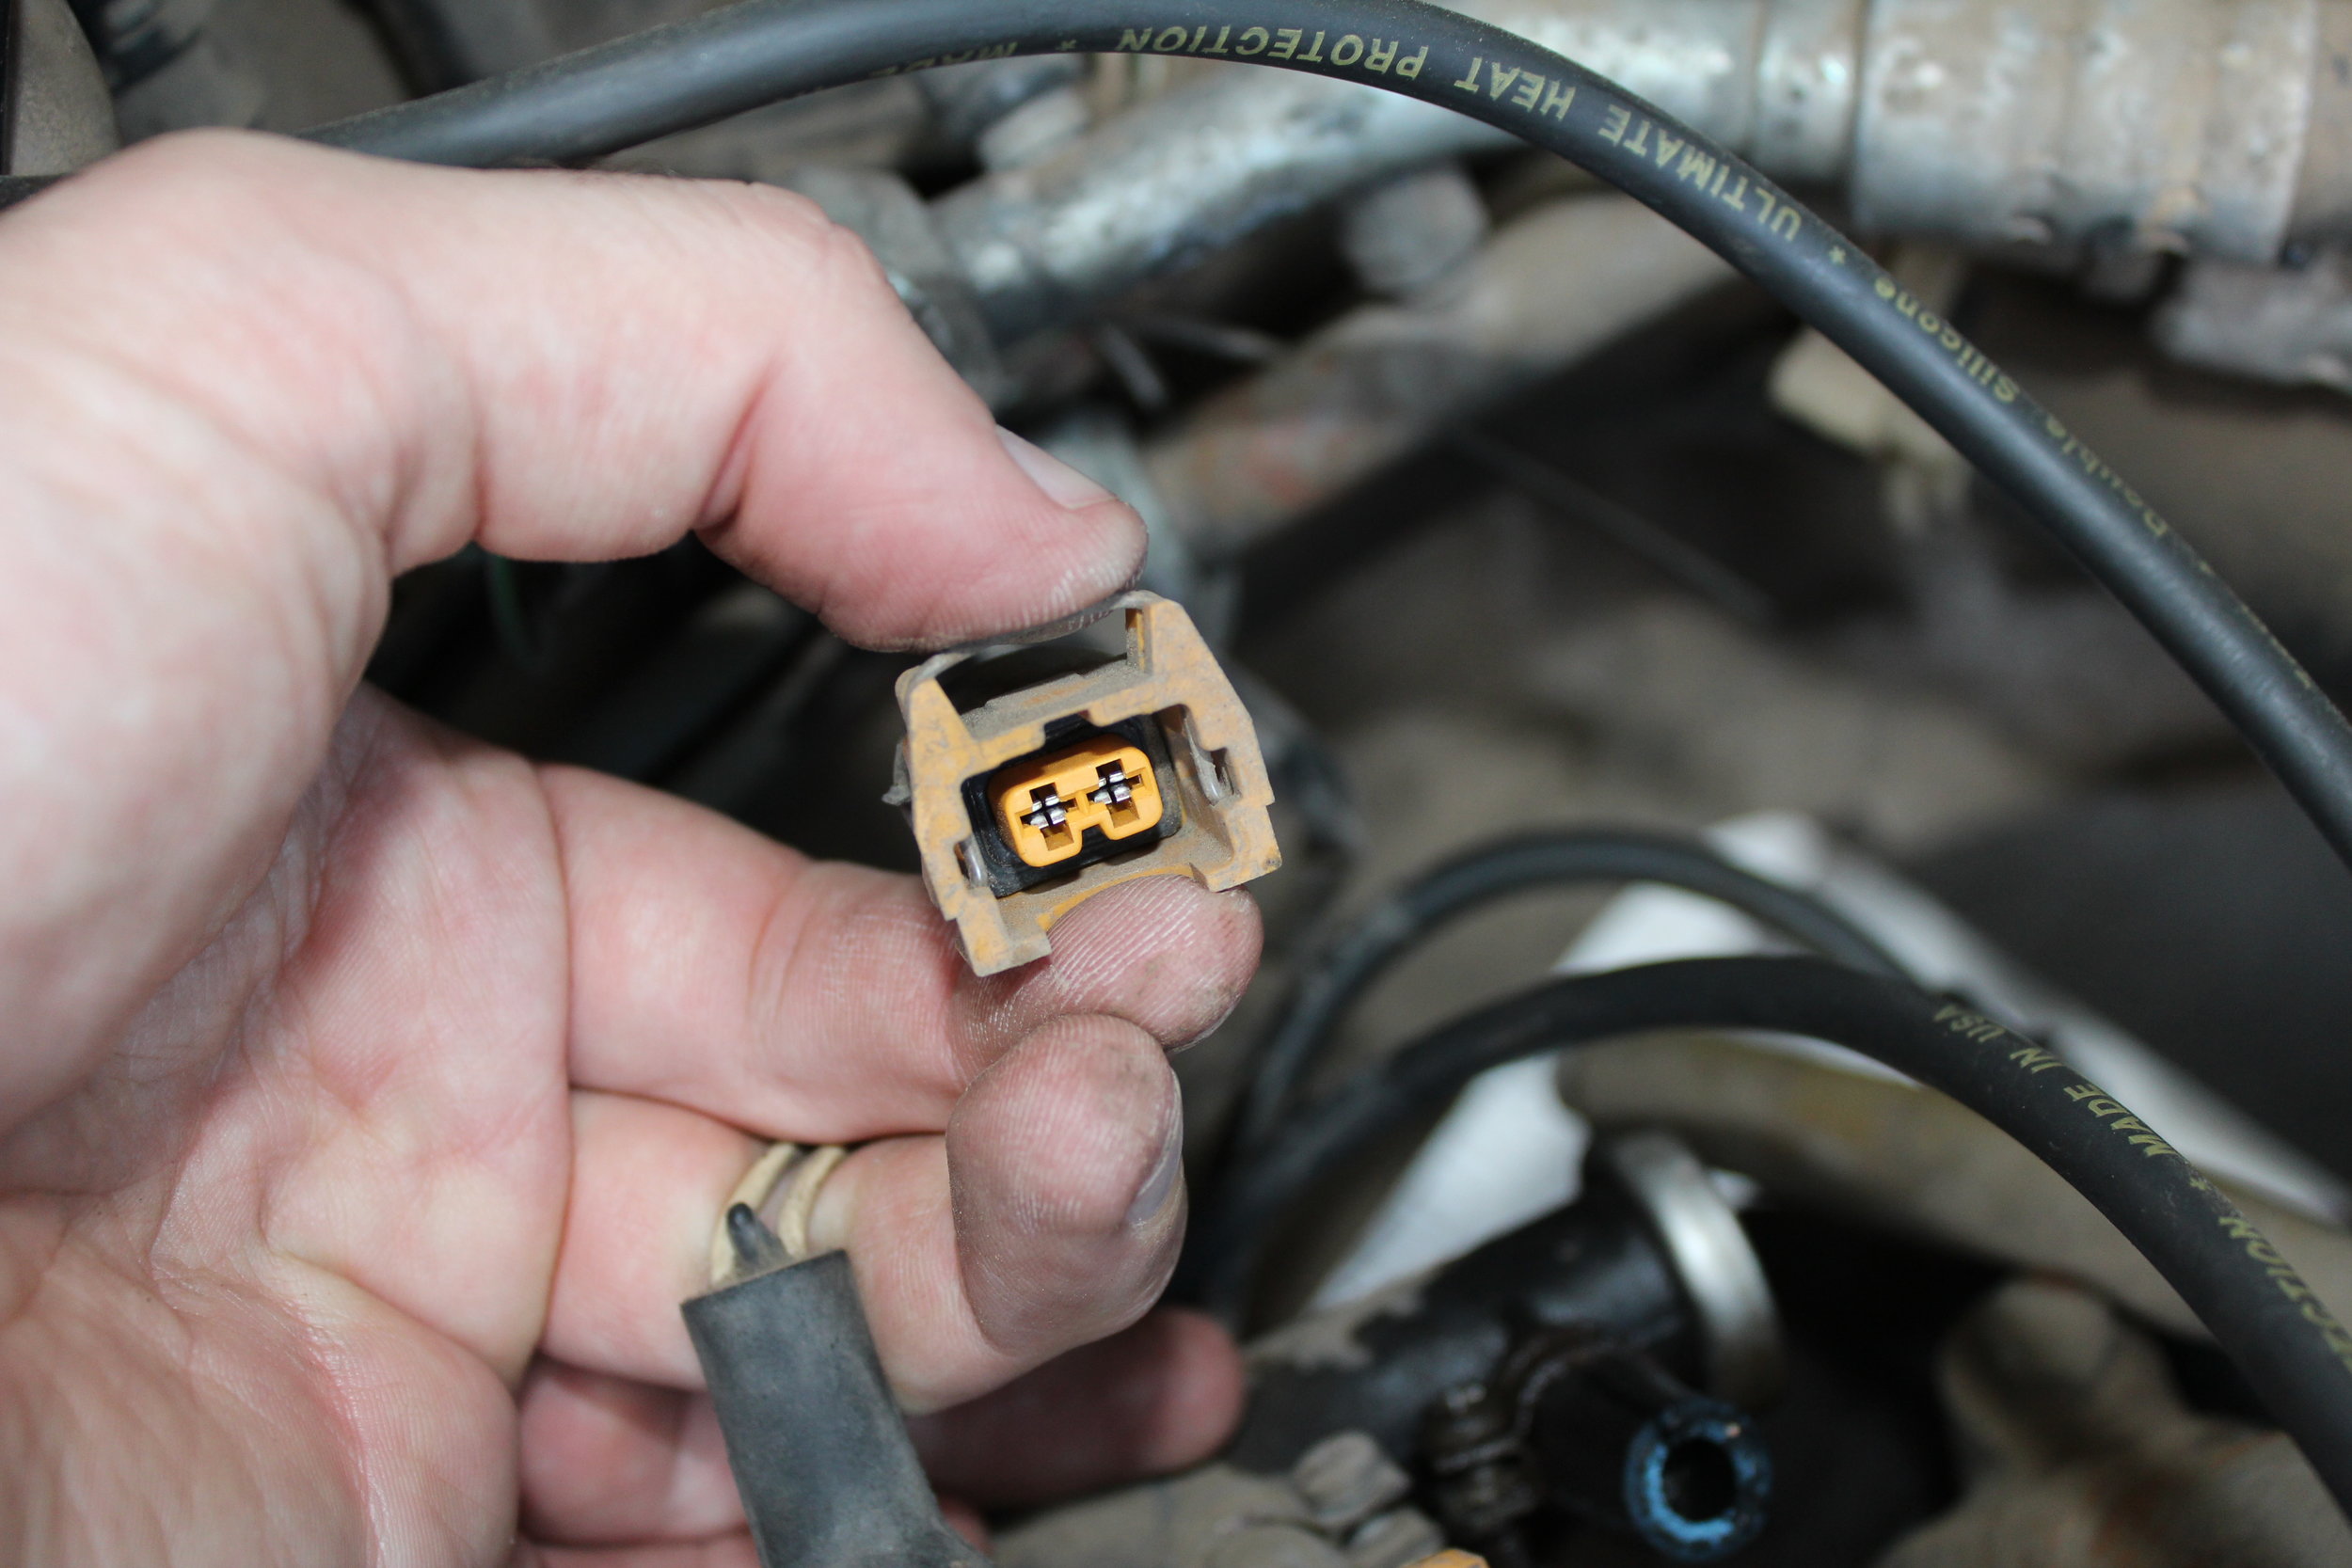
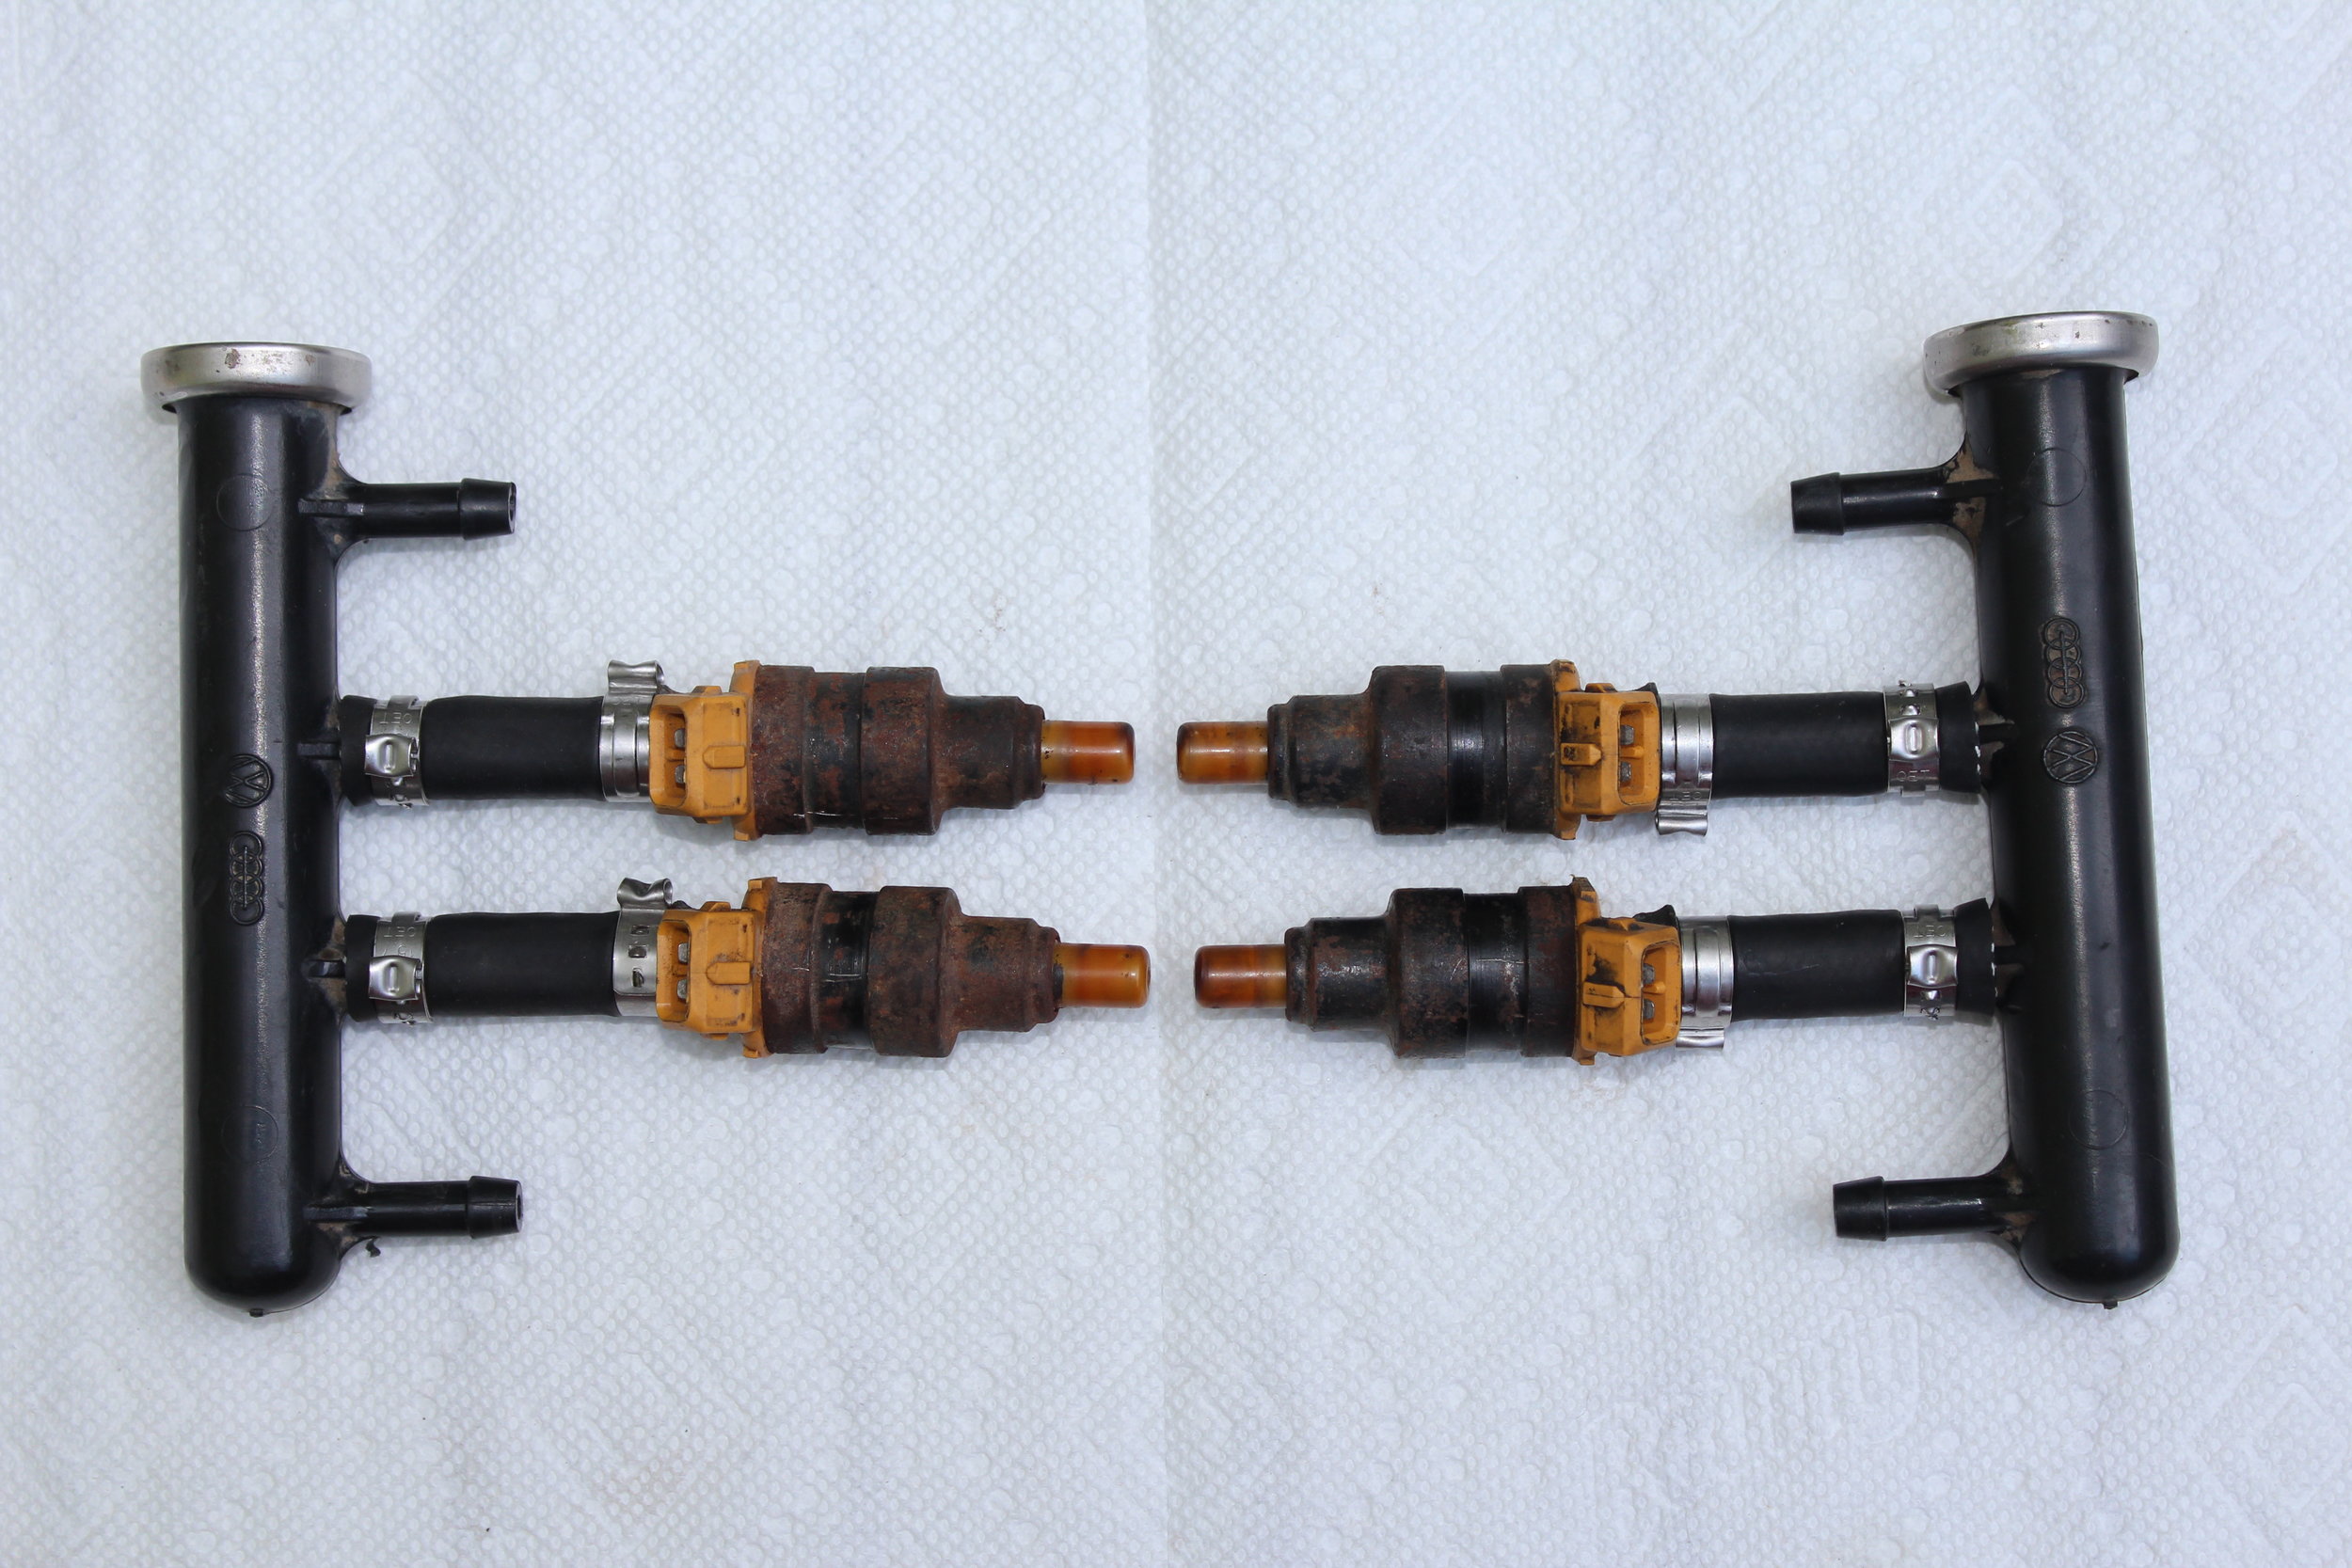
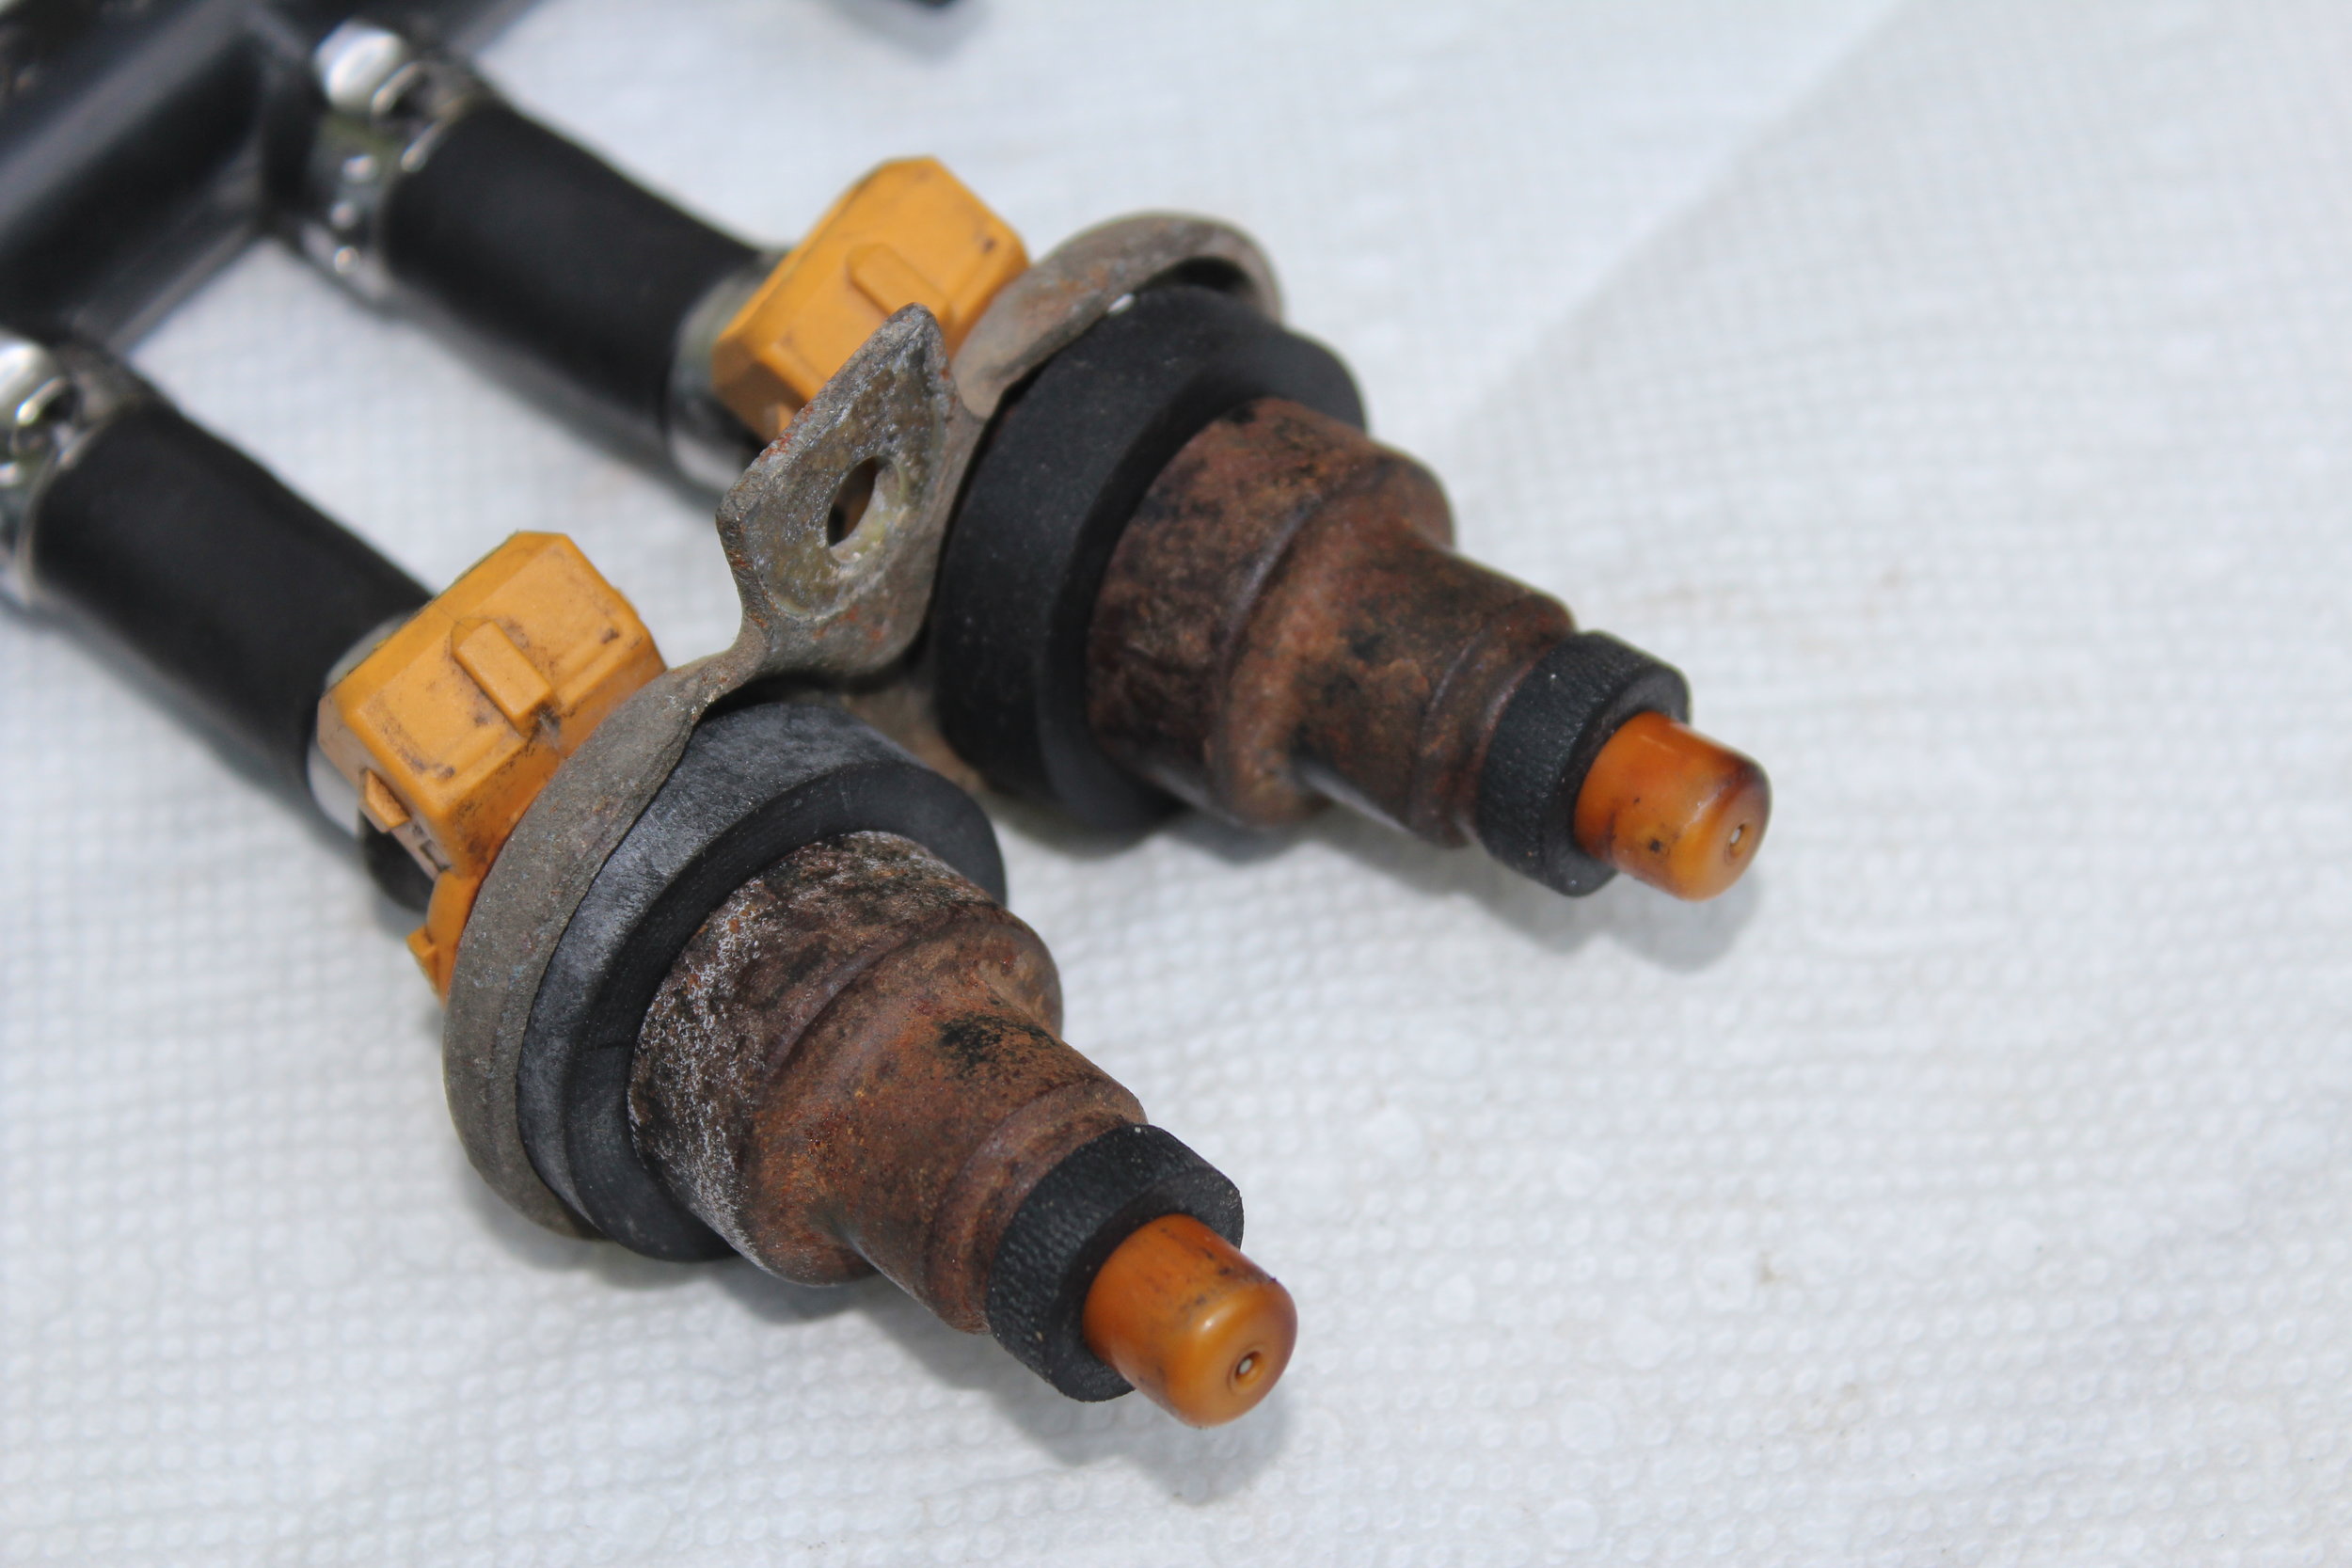
Remove fuel injectors. Each side has two injectors held in place by one metal bracket and one bolt. Loosen the bolt using a 10 mm socket with extension. You can potentially remove the fuel injector spring-loaded electrical connections (yellow parts in pics) first and then loosen the bolt, but the release springs were too gummed-up for me to get a proper grip on them. So, I took everything off first. To remove the electrical connections, simply squeeze the spring firmly on each connection, then pull up. I remember this was not entirely obvious to me the first time. See pictures for a visual explanation.


Step 6:
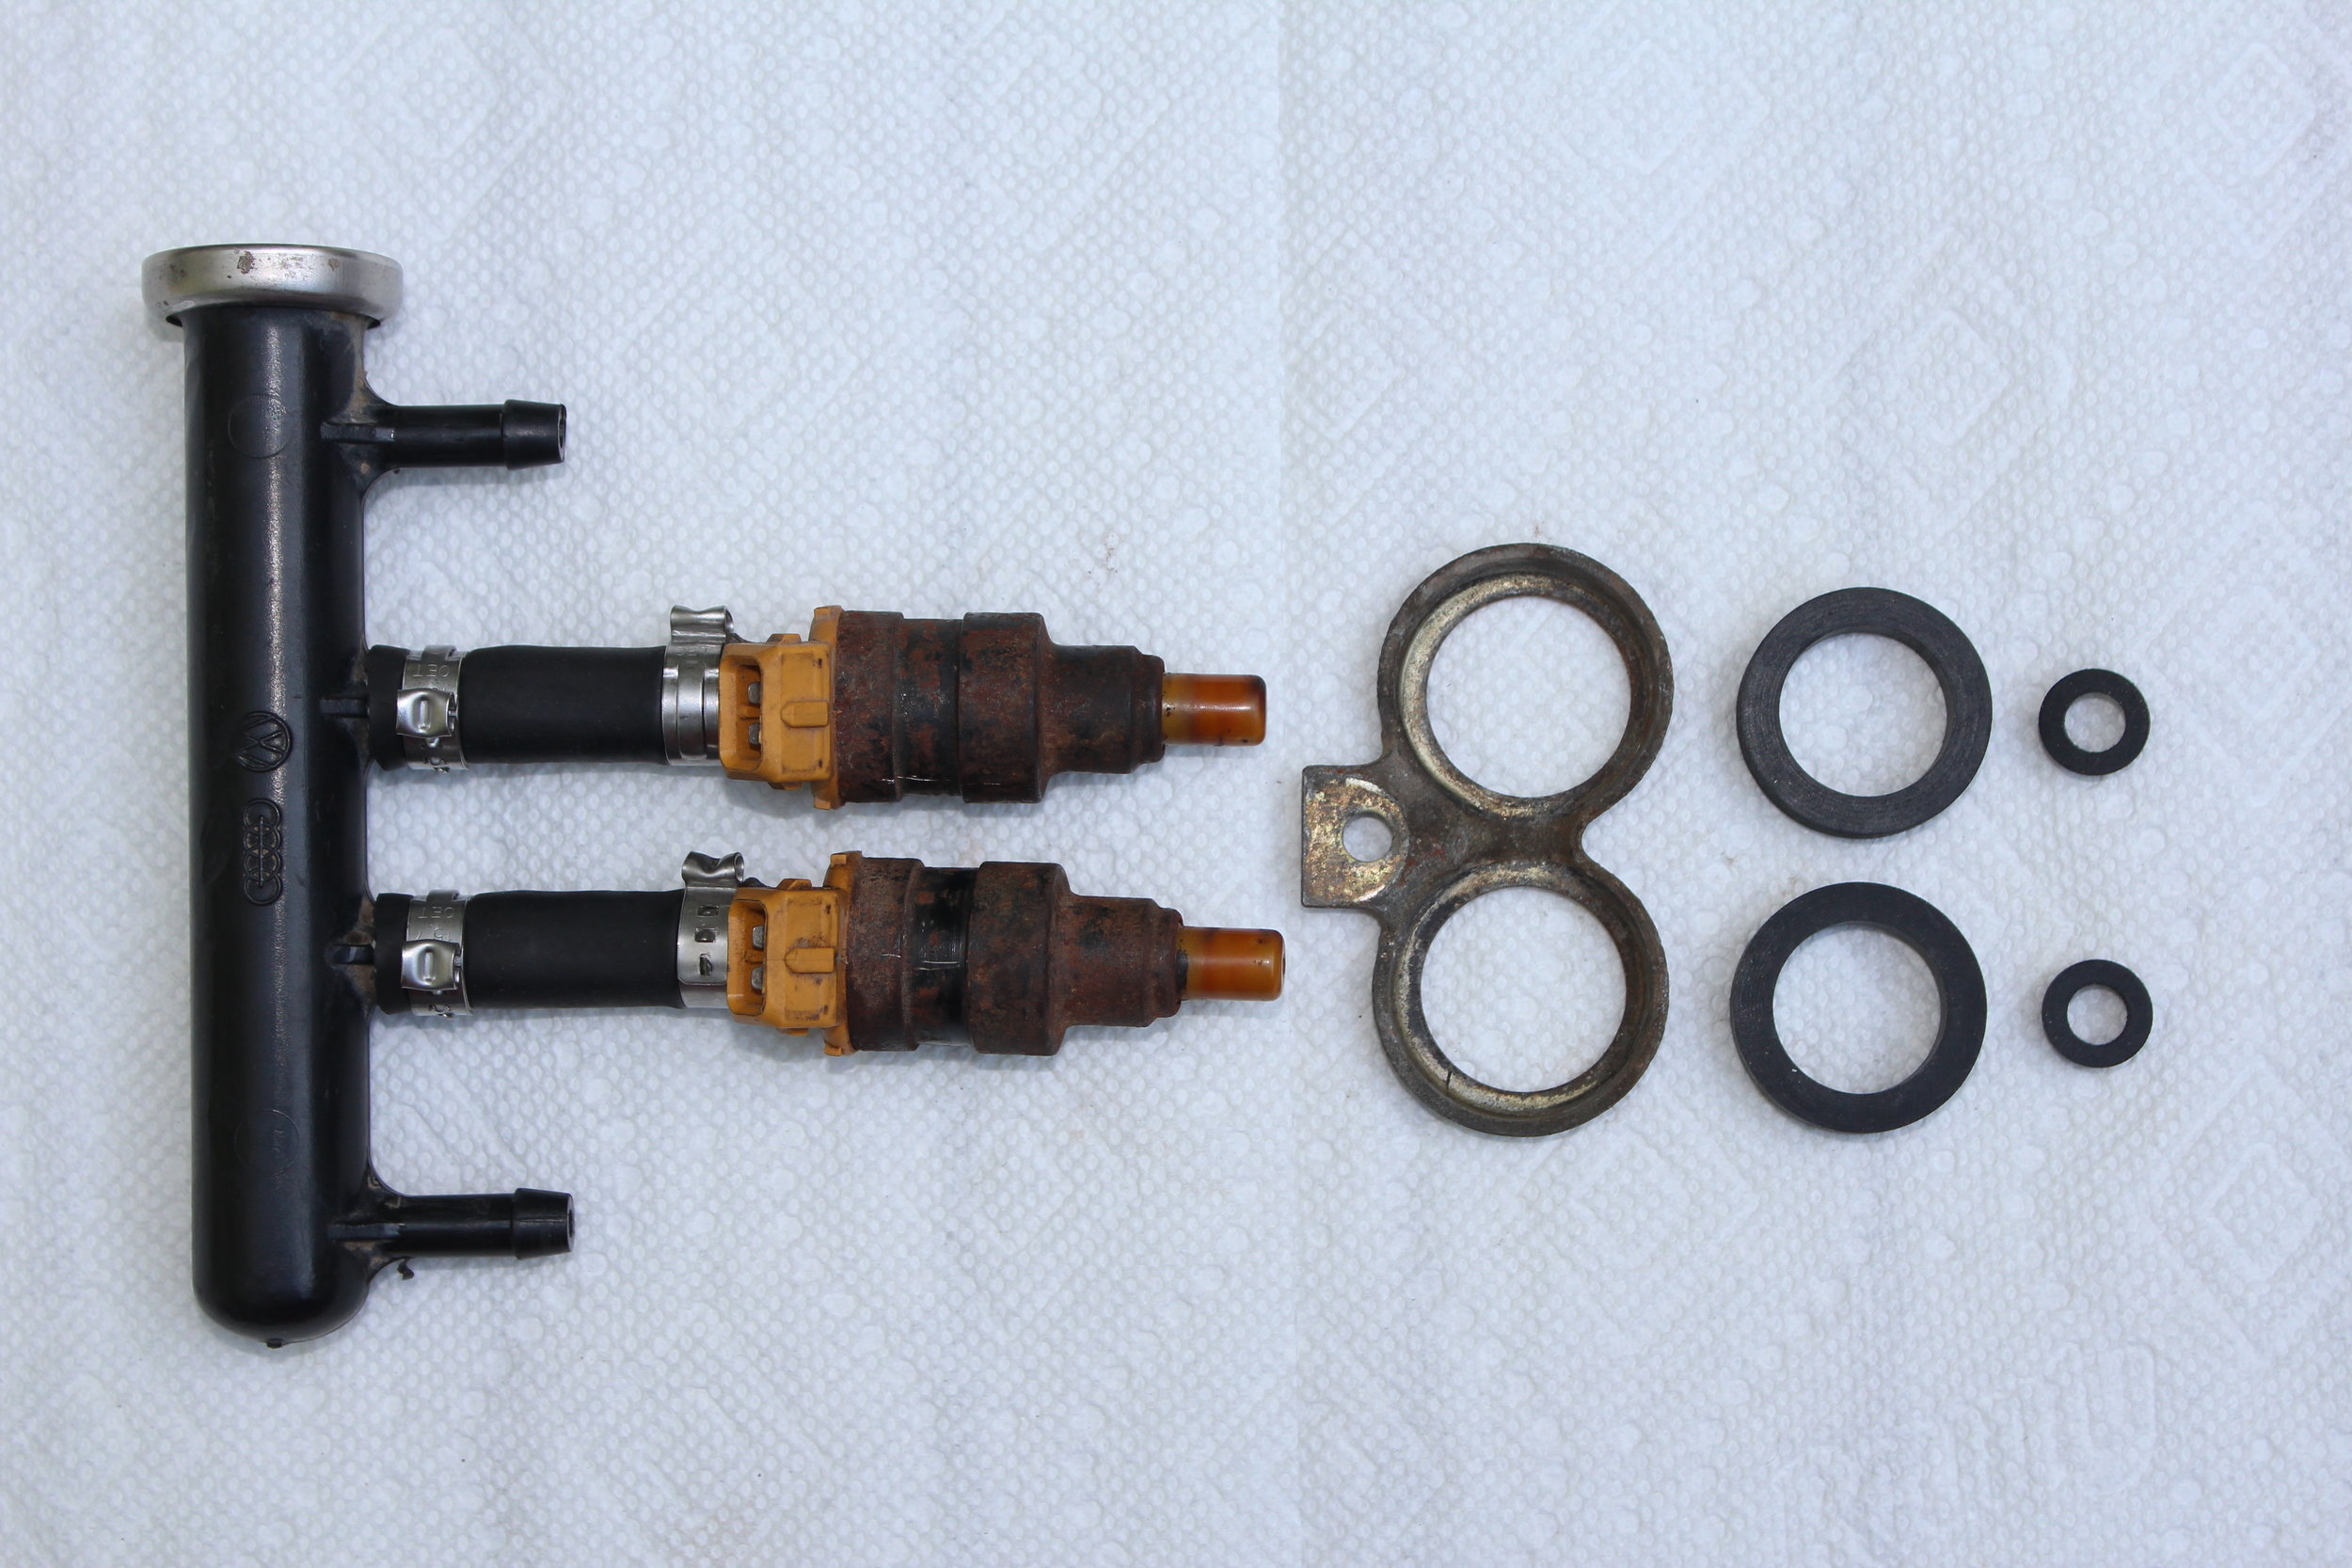
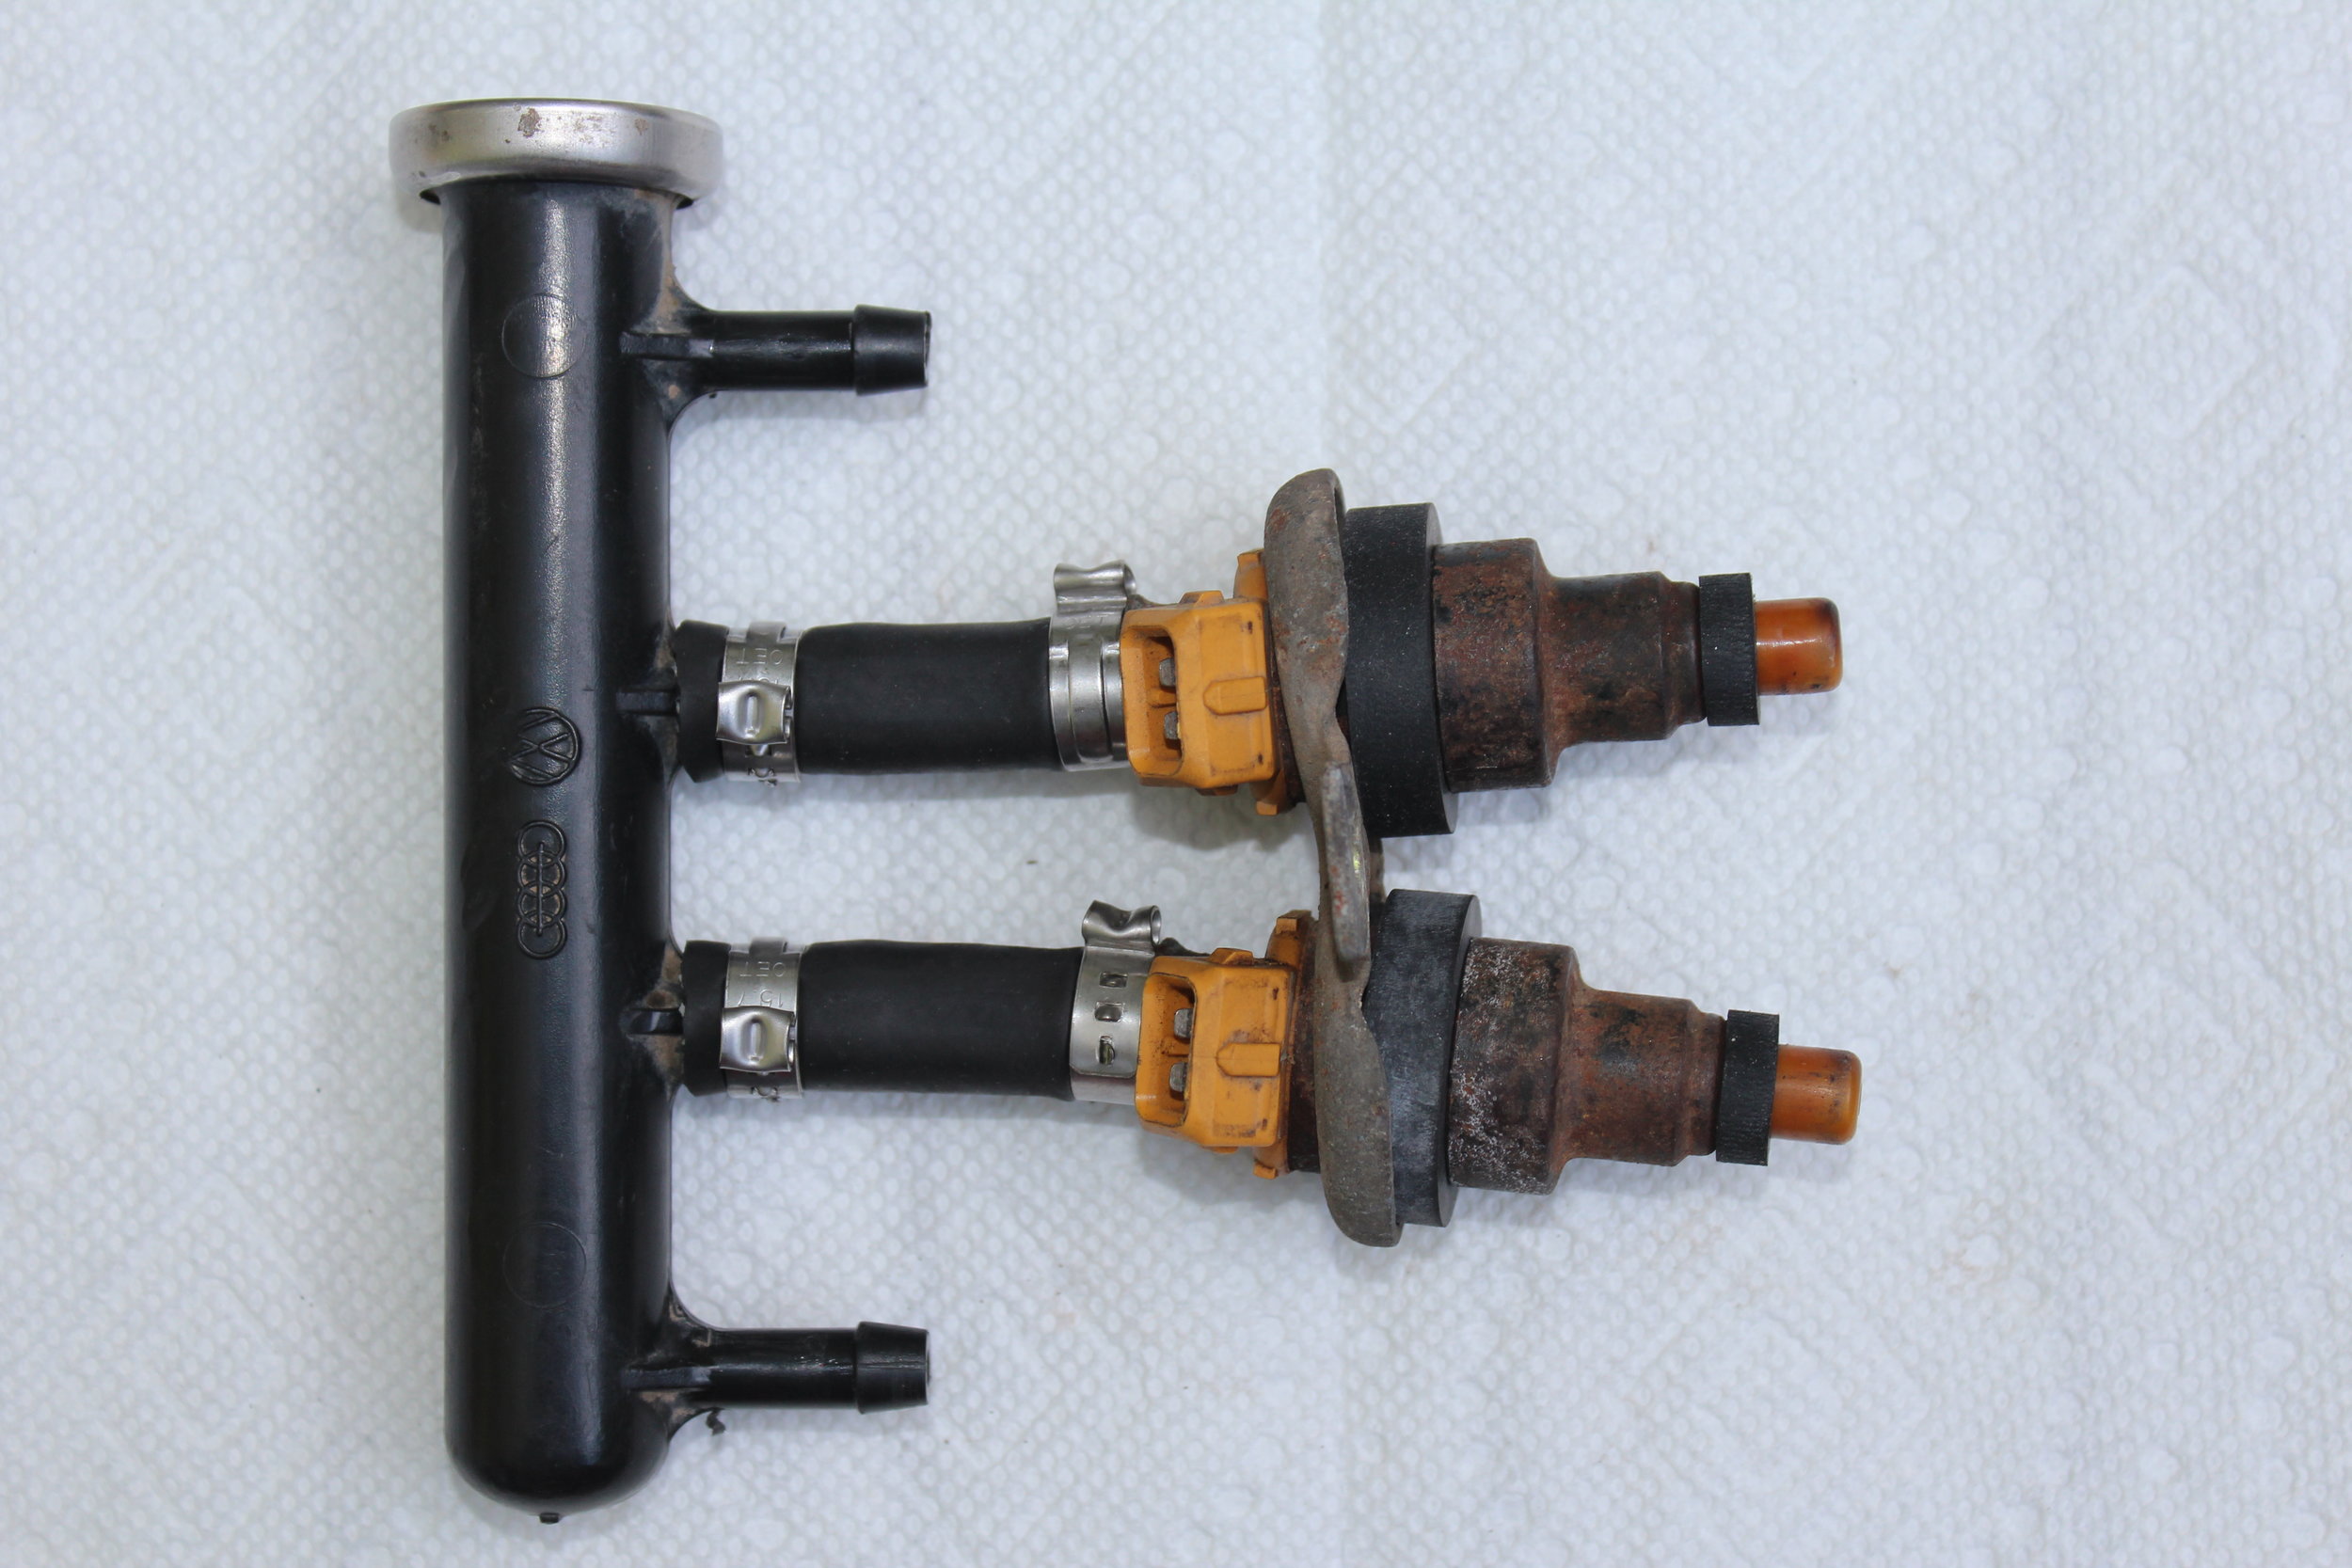
Now that you have the fuel rail and injectors removed, find a table to work at and continue disassembling what's left. Start by removing the rubber gaskets (O-rings or seals, whichever you prefer) from the exterior of the fuel injectors. Again, for this van the rubber was so old and hard I eventually had to cut the rubber to get them off. One of the smaller gaskets was stuck to the engine, so be sure to check the fuel injector outlet on the engine and make sure it's clear of debris. Once the gaskets are removed, the metal bracket should slide right off.
NOTE: Be sure to save one of the short hoses that connects the fuel rail to the injectors. You will need to cut this same length from your new hose later on.
Removing the hoses from the fuel injectors is a little tricky, see Step 7.


Step 7:
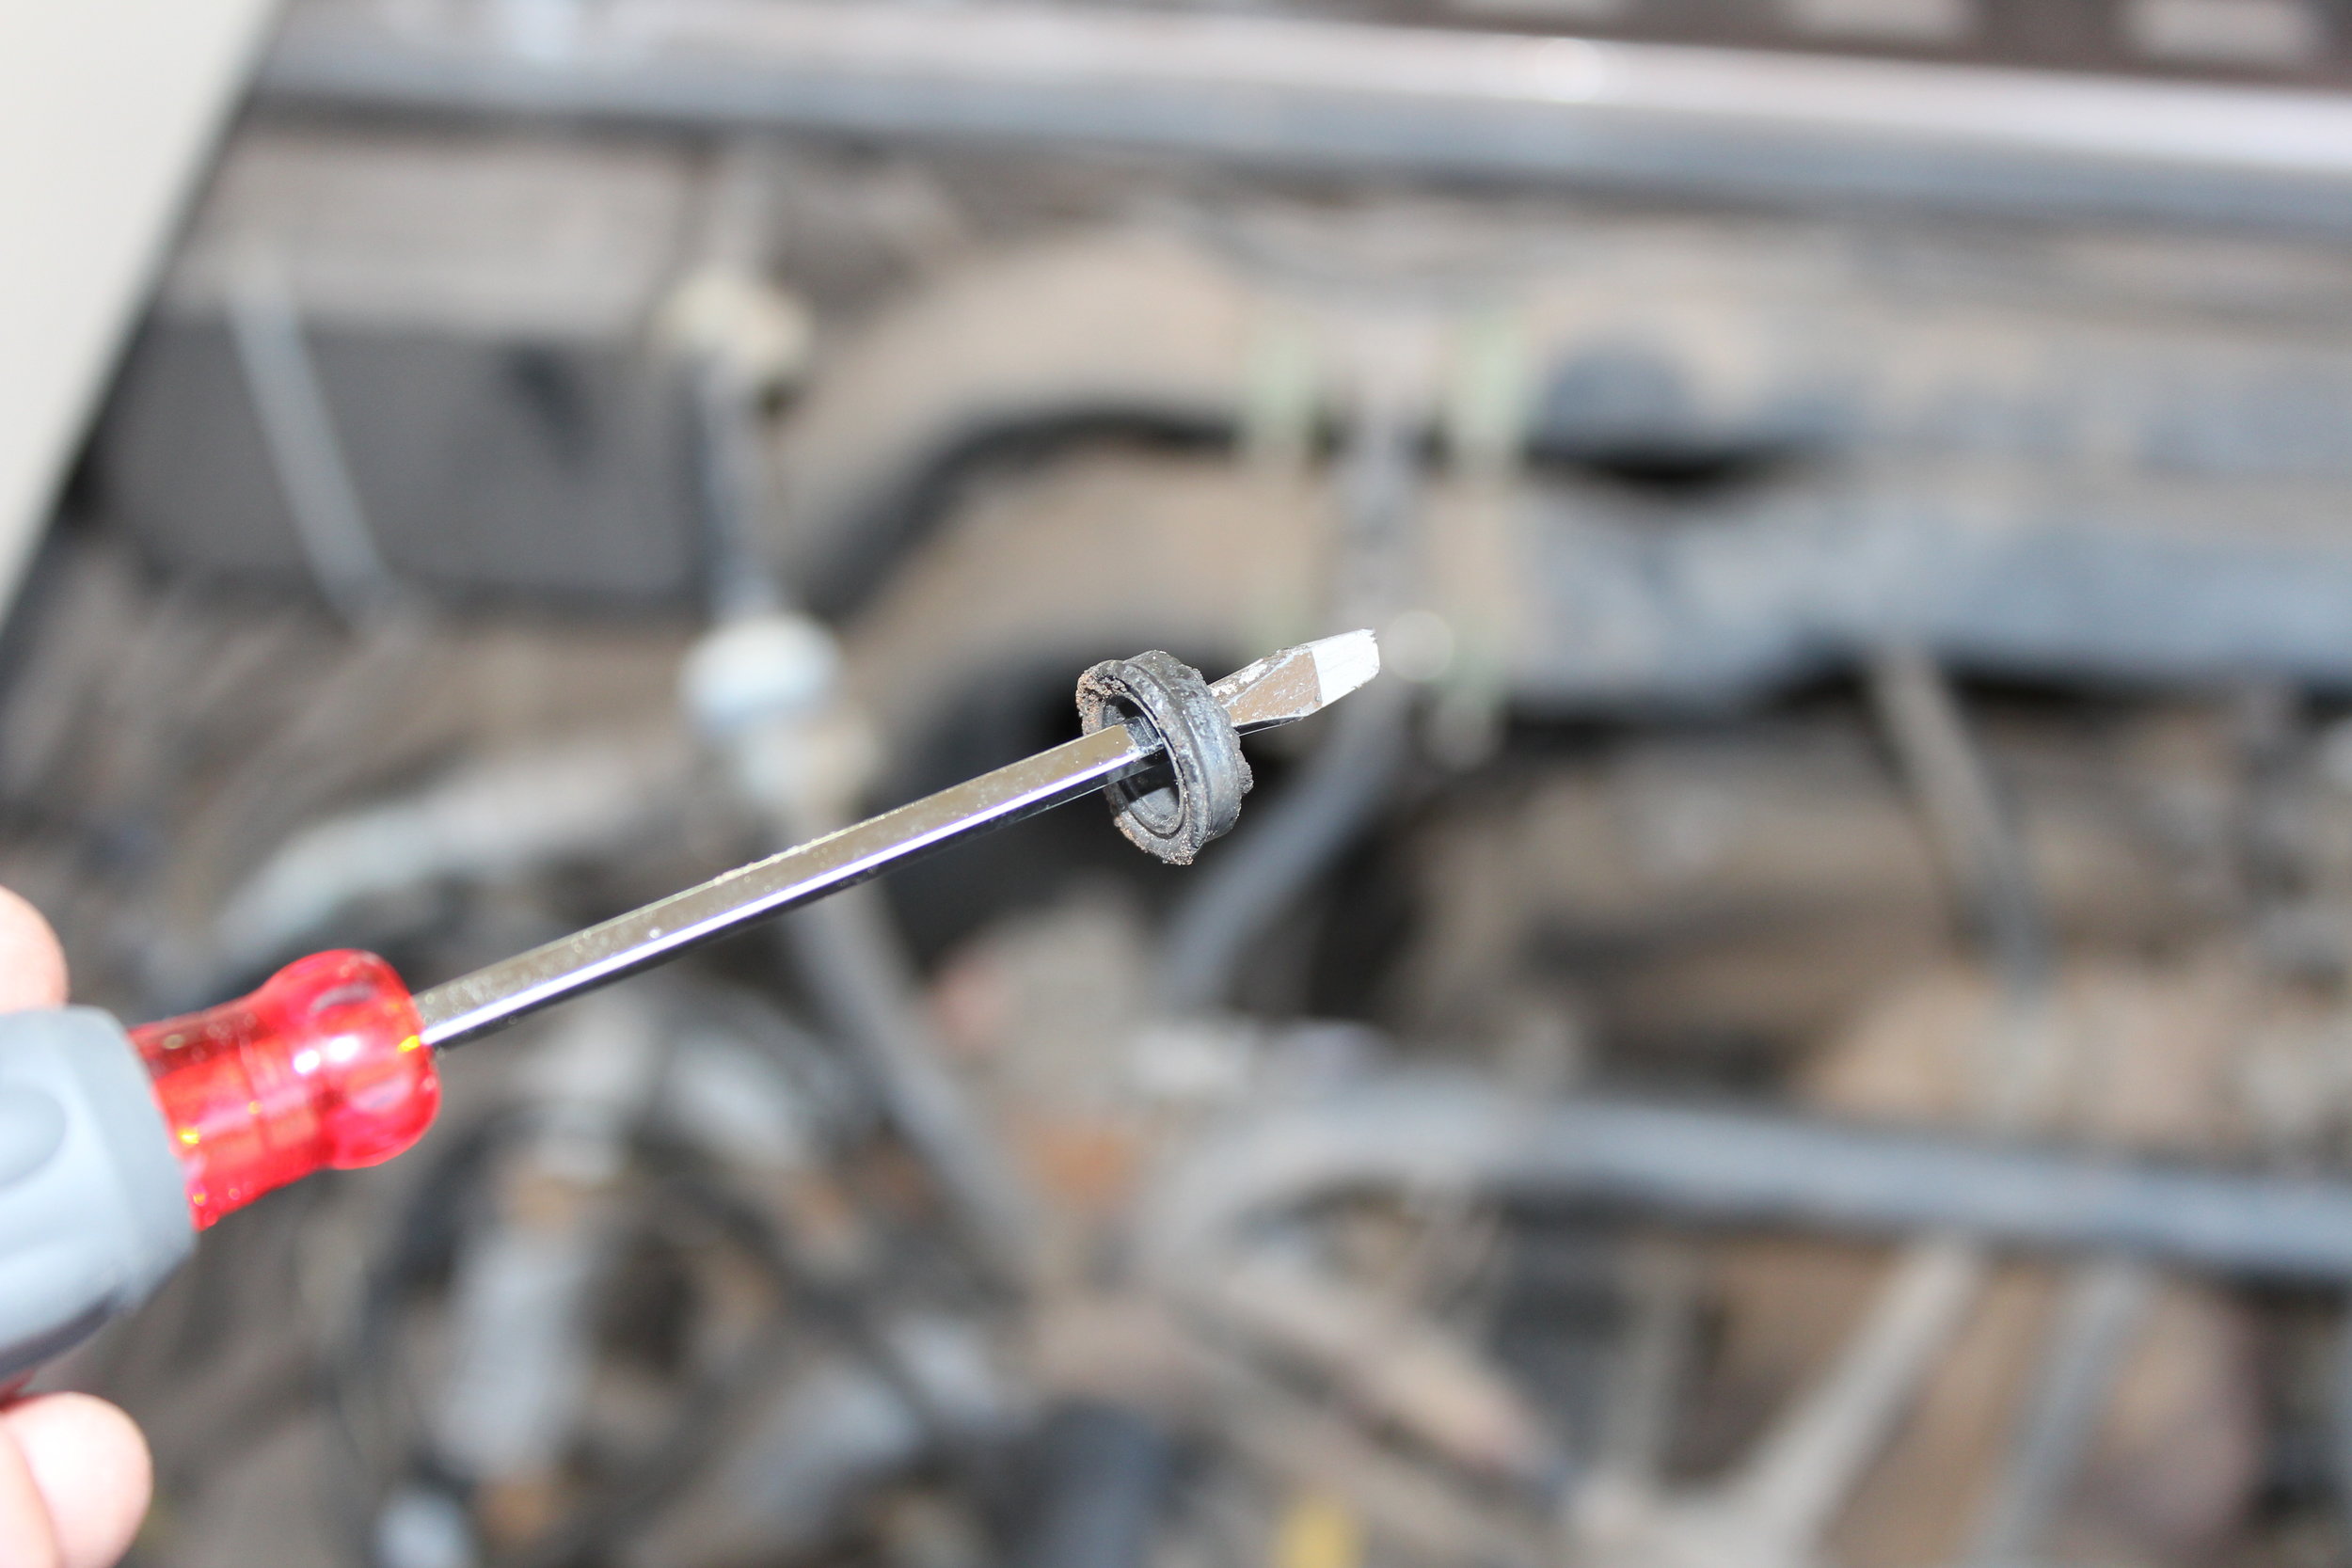
Here's where the X-Acto knife's tapered blade comes in handy. As shown in the picture, cut into the rubber hose going in as deep as you can towards the metal cuff. You can then peel back the hose and cut/tear any remaining connections. The metal cuff will simply fall off once the hose is removed. Pictures are worth a thousand words.
Step 8:
Locate the passenger side fuel rail and repeat Steps 4 - 7. Here's a few quick pics of the passenger side removal:
Step 9:
Clean exterior of fuel injectors. I used a small amount of Seafoam and a toothbrush. Not sure if this acceptable, but it seems to have worked fine. Avoid the electrical connections. Allow to air dry completely. (Sorry, no pics.) I'm sure this step is entirely optional, just something I felt like doing.
Step 10:
Using an old piece that connected the fuel rail to an injector, cut to length four (4) pieces of new hose. Replace the metal cuffs and then firmly push the new hoses onto the injectors.A little squirt of WD-40 can help lubricate and make life easy here. Twisting can help if you're having trouble sliding them on.
Lastly, secure one (1) ear clamp on each connection. When attaching the crimp-style ear clamps, I find it useful to tighten part way, reposition, and then fully clamp tight.


Step 11:
Re-attach each injector to the center nipples for both fuel rails.
Step 12:
Re-install the metal injector bracket and then install the new rubber gaskets. Do NOT install the gaskets before the metal bracket as it won't fit!

NOTE: We initially took the advice to NOT clamp the hoses at the injectors, as supposedly the tension alone would keep everything connected. However, we have observed in rare cases hoses slightly backing off. We now recommend that you ALWAYS clamp any and all hose connections, including here, on both sides of the injectors. The minimal cost for four extra clamps far outweighs the downside of an engine fire. From here forward you will see our original pictures that do not include the additional clamps. (Sorry, but it's just too much work to update every picture ever taken.) Simply ignore that the extra clamps are missing from the pictures. Follow the above steps and install the extra clamps!
Step 13:
Back to the van…re-install the fuel injector assemblies you just worked on. All that's involved here is securing the bracket with the bolt and washer you removed in Step 5 above, and re-connecting the yellow electrical connections.
Step 14:
Jack up the rear passenger side of the Vanagon to access the plastic firewall connector from below.
NOTE: You can never be too safe when jacking. Always use a flat hard surface, block all wheels not being jacked on both sides, use ramps and/or jack stands whenever possible. Leave the jack in place as an additional support and for quick access should something happen. Even with all of this in place be as gentle as possible when working under the van. Again, you can never be too safe!
Many people will claim you don't need to jack the van to access this connection, and can simply slide under it. However, these people must be small, or at least smaller than 6'1, 200 lbs. Obviously if you can reach it without jacking that's great, as it's safer that way. But I found it too cramped to maneuver properly, hence using the jack.
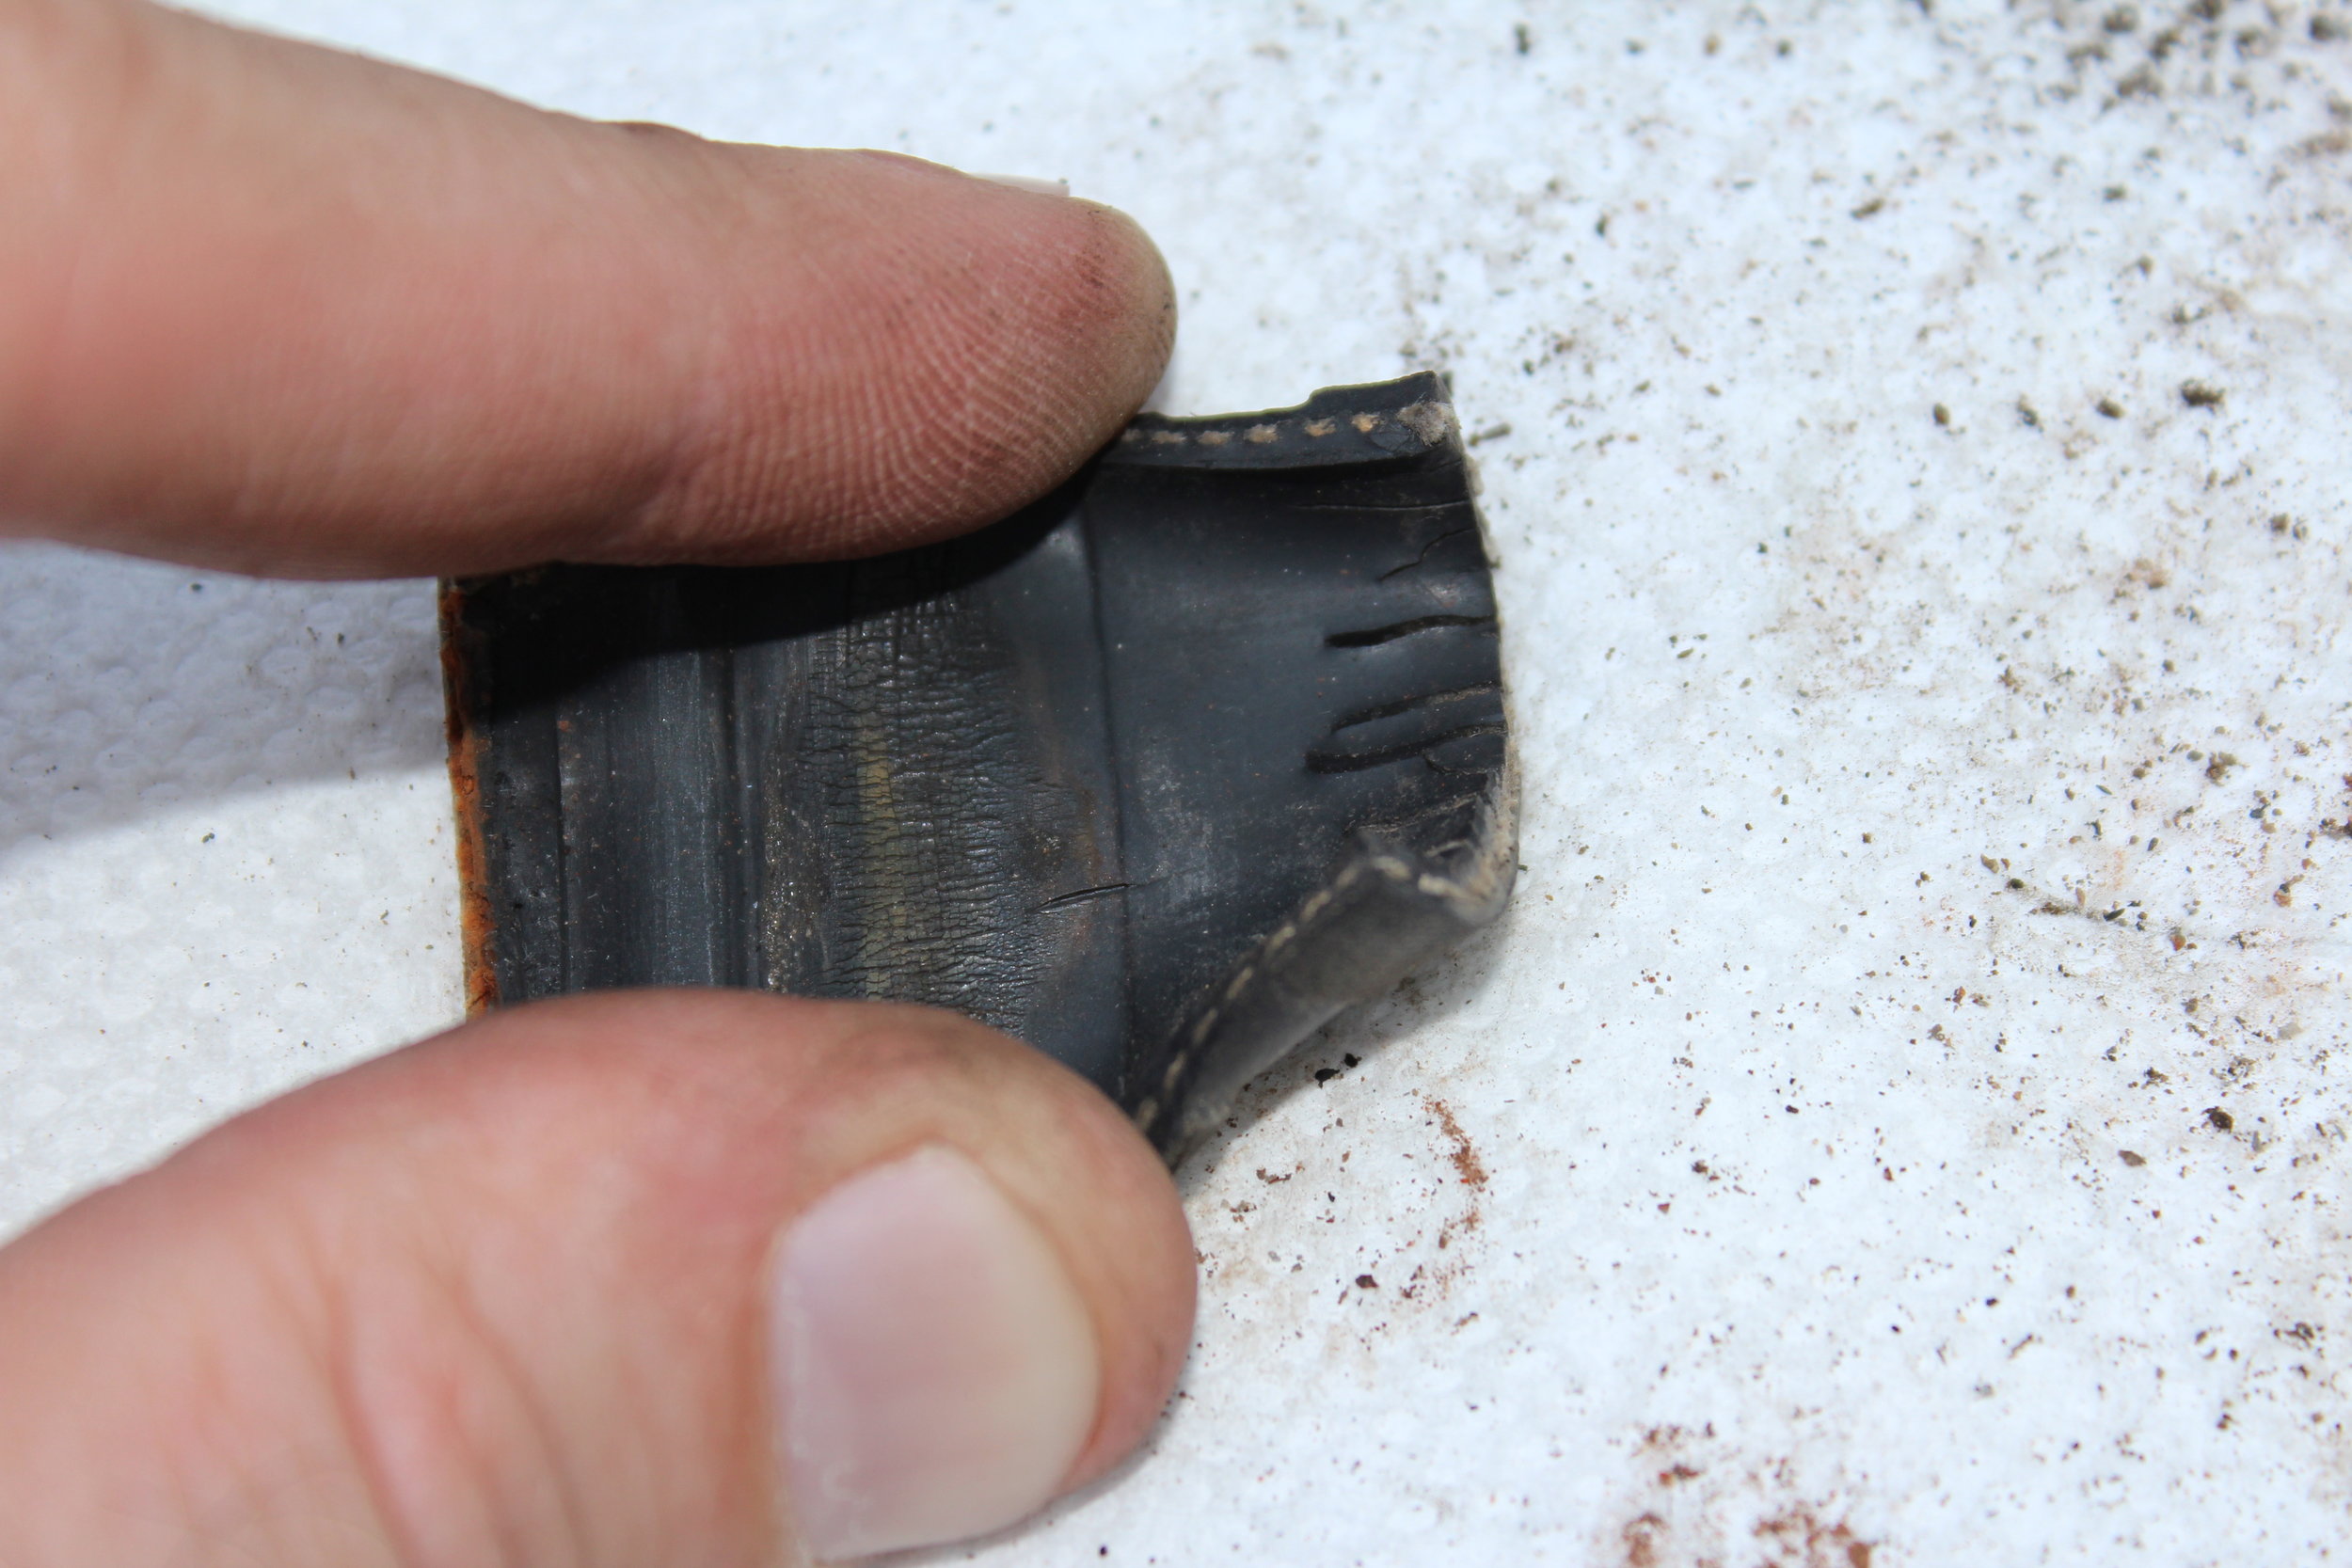
There will be two bolts holding the plastic connector in place. If you have trouble accessing these from below, I have had success by gently moving aside the coolant hose that's blocking direct access from above. (See pictures.) Remove the bolts for the plastic fitting, and then remove any clamps and/or cut the hoses that attach to it. This plastic fitting is a major cause for engine fires. DO NOT REUSE. After time, it becomes brittle and can leak or even completely fail. This will be discarded and replaced with a rubber grommet so the new hose can simply pass through continuously.
All that's left down here is to unscrew and/or cut the connection between the rubber hose and hard-plastic line that's in the wheel well. Keep van jacked.
Step 15:
Moving back to the engine bay, find the metal T-fitting from earlier. You can now remove and replace each section with new hose. There may or may not be protective sleeves on some of them. I reuse them if they are there. (Apparently some people don't use them at all though.) There are many ways you can do this. The main thing is to make sure you cut each hose to the proper length. I mocked up each one as best I could before making the cut, as you need to be somewhat precise. I did the two sides first, and then the firewall connection. (See next step for more details on the firewall connection.)
NOTE: For the firewall connection you will need to measure a new, longer length that will continue through the firewall and connect to the hard-plastic fuel line. Do not simply make a duplicate of the previous length as it will be too short!
Step 16:
For the firewall connection...sliding back under the van:
- Install the rubber grommet into the hole where the old hard-plastic fitting used to be. Feed the new hose through the grommet.
- Slide one ear clamp onto hose.
- Insert the hard-plastic fuel line into the rubber hose approximately 1 - 2 inches. I'm actually not sure what the official spec is for this, but I have had no issues doing it this way.
- Tighten hose clamp, making sure it's properly in position to include the hard-plastic line that is now inside the rubber hose.
- Cut the hose (if not already done) and clamp the connection at the metal T-fitting.
- You are now done with the passenger underside. Lower the jack when done.
Step 17:
Moving to the driver side, jack up the van to access the firewall from below. Similar to Step 14, unscrew the clamp and/or cut the connection between the hard-plastic and rubber fuel lines. There is no plastic fitting on this side to worry about. Keep van jacked.
Step 18:
This is basically Step 15 all over again, just on the driver side. Moving back to the engine bay, start replacing the three fuel lines that connect to the fuel pressure regulator. When replacing the firewall hose, inspect the rubber grommet that it passes through. If worn or damaged be sure to replace. When you're done with the firewall hose, lower van from jack.
Step 19:
Now that you are familiar with the above, you need to replace the small sections of hose that connect the fuel tank --> fuel pump --> fuel filter. Should be pretty simple / self explanatory at this point. Remove old hose, cut new sections to length, clamp in place. If you ordered our kit shown at the top of this page you will have larger hose and clamps, this is where they go.
Step 20:
Re-connect the battery. Prime the fuel pump by toggling the key to the "on" position a few times. This will help pressurize the system and gives you one last chance to check for any leaks. With your fire extinguisher in close reach (just in case!), start it up. Double-check all of your new hose connections to make sure there's no leaks! After that, you're done!
Maintenance
Modern fuels are harsh and abrasive on rubber products, so going forward you will need to inspect your hoses and connections on a regular basis. Replace when worn or every five (5) years, whichever comes first. Whether you use our kit or something else, Vanagon fuel line maintenance is no joke. If neglected, it can literally burn your van (and anything / anyone in it) to the ground. If you notice any surface cracking or fuel seeping from your hoses you must replace them immediately!